When you develop a web API it is important that other developers can understand what they have to POST, PUT, DELETE, or will GET when talking with your API. It can be challenging to build good documentation for a developer when they are done coding. Due to Swagger (known as OpenAPI), you can now easily make API documentation using Swagger while coding.
By using Swagger with .NET Core and in combination with ReDoc we can make great documentation for our APIs while making the code. It provides us and other developers with an interactive frontend containing documentation and ways to test out our API.
If you are ready to make some documentation the easy way for your .NET Core API, then let’s get started.
A quick comparison of Swagger VS ReDoc [Free edition]
The only difference between Swagger and ReDoc when running them in the free editions is that you can not try requests in ReDoc, only in Swagger. On the other hand, you won’t have the three panels in Swagger as you have in ReDoc. I really like the three panels, where I can see code examples on my right when scrolling through the documentation.
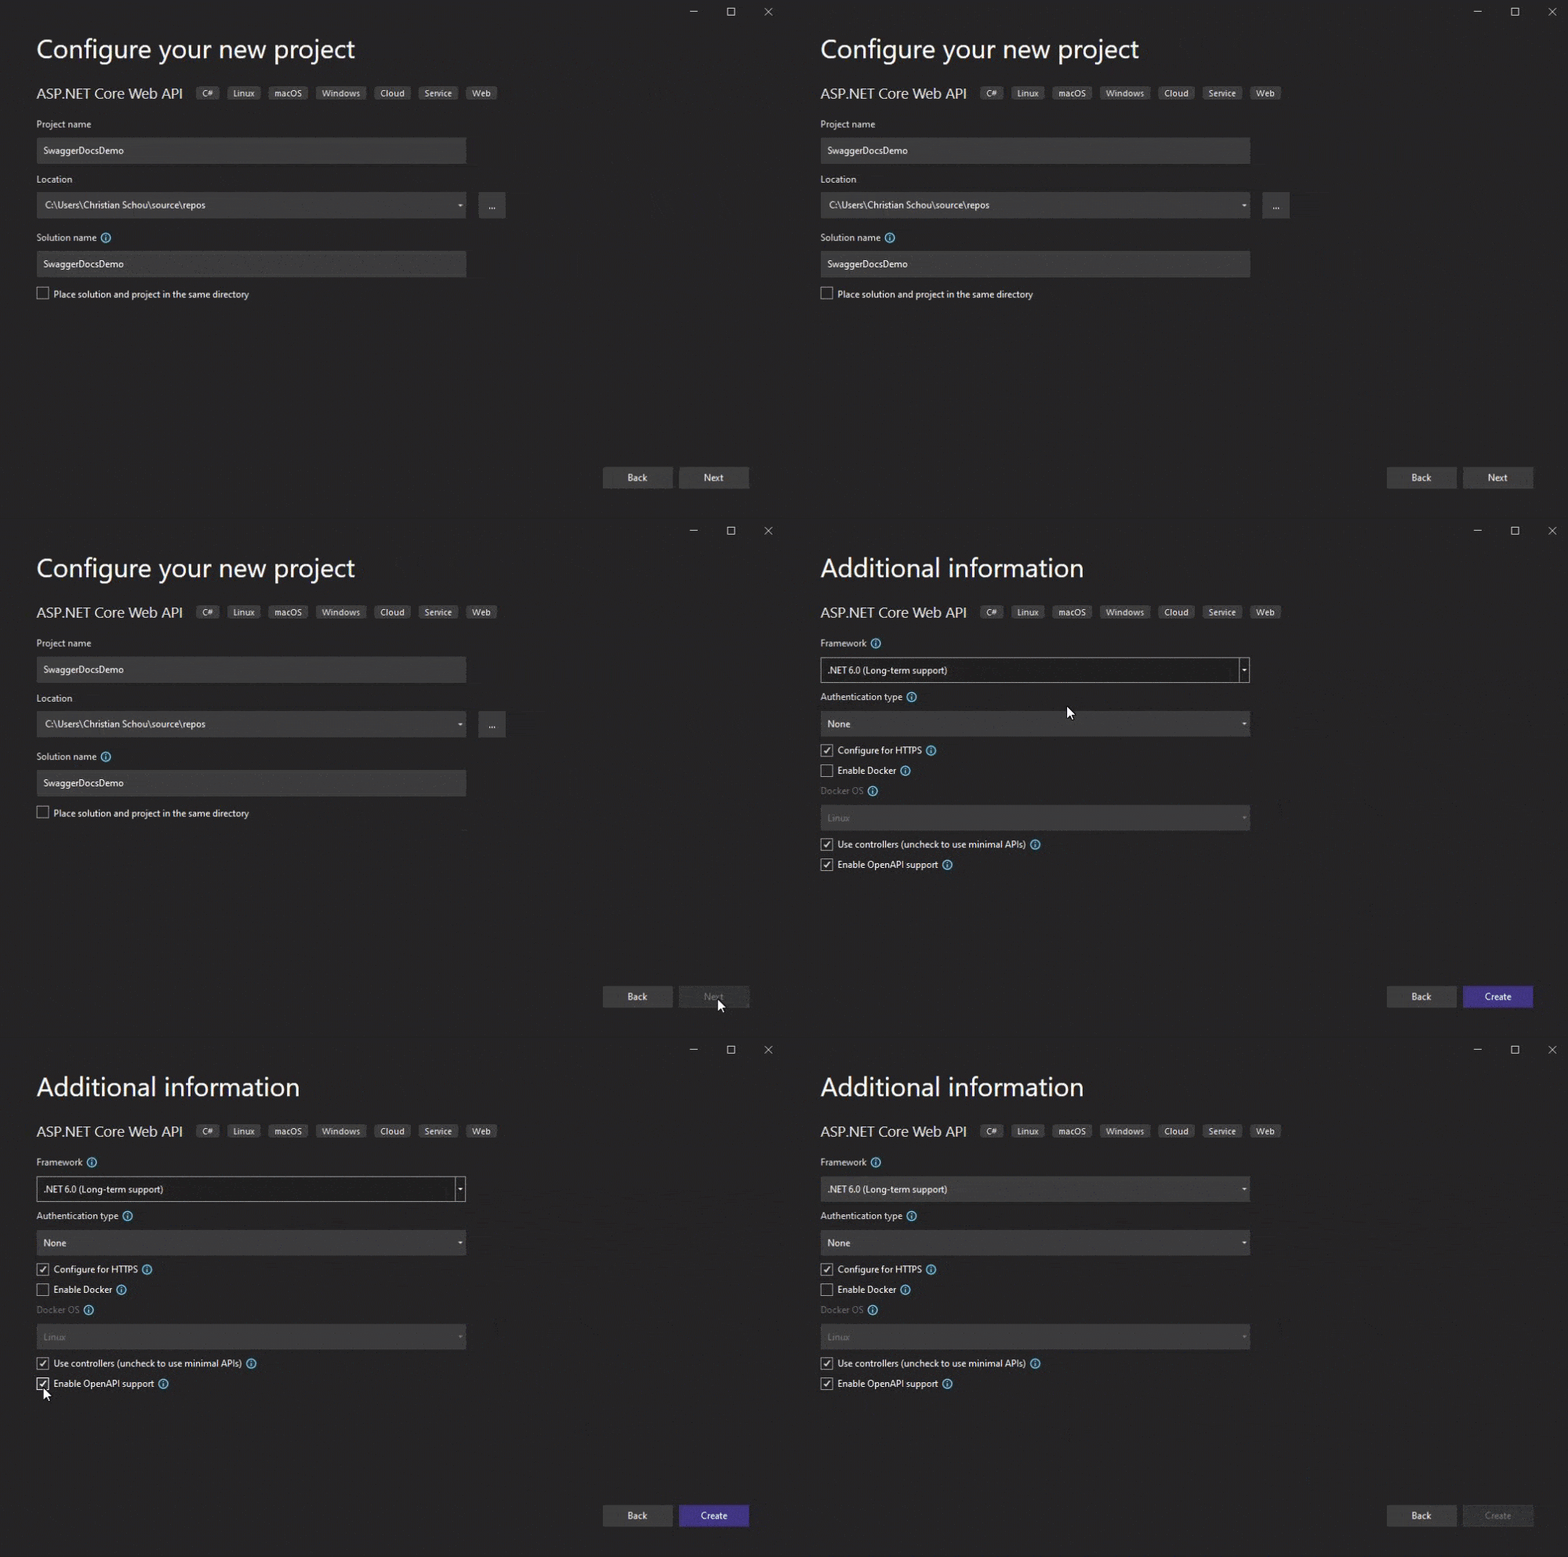
Create a new ASP.NET Core Web API from the template
First, you have to create a new ASP.NET Core Web API (I will be using Visual Studio for this demo). Search for ASP.NET Core Web API in the templates and create a new project.
Install required packages for Swashbuckle, ReDoc, and annotations
The packages we will need for this documentation project to work are listed below. Alle snippets below are for installing the package using the NuGet Package Console.
#1 – Swashbuckle.AspNetCore
This package is Swagger tools for documenting APIs built on ASP.NET Core. You can get the latest package version from NuGet.org here: Swashbuckle.AspNetCore.
Install-Package Swashbuckle.AspNetCore#2 – Swashbuckle.AspNetCore.ReDoc
This package is Middleware to expose an embedded version of ReDoc from an ASP.NET Core application. You can get the latest package version from NuGet.org here: Swashbuckle.AspNetCore.ReDoc.
Install-Package Swashbuckle.AspNetCore.ReDoc#3 – Swashbuckle.AspNetCore.Newtonsoft
This package is a Swagger Generator opt-in component to support Newtonsoft.Json serializer behaviors. You can get the latest version from NuGet.org here: Swashbuckle.AspNetCore.Newtonsoft.'
Install-Package Swashbuckle.AspNetCore.Newtonsoft#4 – Swashbuckle.AspNetCore.Annotations
This package provides custom attributes that can be applied to controllers, actions, and models to enrich the generated Swagger. You can get the latest version from NuGet.org here: Swashbuckle.AspNetCore.Annotations.
Install-Package Swashbuckle.AspNetCore.AnnotationsConfigure Swagger
Open program.cs and add the following lines of code. If you have made the project from a template, Swagger has already been added for you. Your file should look like the following:
var builder = WebApplication.CreateBuilder(args);

// Add services to the container.

builder.Services.AddControllers();
// Learn more about configuring Swagger/OpenAPI at https://aka.ms/aspnetcore/swashbuckle
builder.Services.AddEndpointsApiExplorer();
builder.Services.AddSwaggerGen();

var app = builder.Build();

// Configure the HTTP request pipeline.
if (app.Environment.IsDevelopment())
{
    app.UseSwagger();
    app.UseSwaggerUI();
}

app.UseHttpsRedirection();

app.UseAuthorization();

app.MapControllers();

app.Run();
Now let’s modify our Swagger configuration a little to include some more details for the client. We are also going to change the location of our swagger.json definition. Below is the code and an explanation:
using Microsoft.OpenApi.Models;

var builder = WebApplication.CreateBuilder(args);

// Add services to the container.

builder.Services.AddControllers();
// Learn more about configuring Swagger/OpenAPI at https://aka.ms/aspnetcore/swashbuckle
builder.Services.AddEndpointsApiExplorer();
builder.Services.AddSwaggerGen(options =>
{
    options.SwaggerDoc("v1",
        new OpenApiInfo
        {
            Title = "Swagger Demo Documentation",
            Version = "v1",
            Description = "This is a demo to see how documentation can easily be generated for ASP.NET Core Web APIs using Swagger and ReDoc.",
            Contact = new OpenApiContact
            {
                Name = "Christian Schou",
                Email = "someemail@somedomain.com"
            }
        });
});

var app = builder.Build();

// Configure the HTTP request pipeline.
if (app.Environment.IsDevelopment())
{
    app.UseSwagger();
    app.UseSwaggerUI(options =>
    options.SwaggerEndpoint("/swagger/v1/swagger.json",
    "Swagger Demo Documentation v1"));
}

app.UseHttpsRedirection();

app.UseAuthorization();

app.MapControllers();

app.Run();- Line 10 – 24 – Here we are extending our Swagger generator to include Swagger Docs. I have used the SwaggerDoc extension and created a new OpenApiInfo object with details about the API and included an OpenApiContact object. This will instruct a developer reading about the API on who to contact in case of issues or questions.
- Line 32-34 – This is the place where I have defined where I would like
swagger.jsonto appear. If I were to have multiple versions I would have written my code in another way.
Let’s fire up the application and check first the Swagger front-end and the swagger.json endpoint. Both should be available at:
- https://your-host-and-port/swagger/index.html
- https://your-host-and-port/swagger/v1/swagger.json
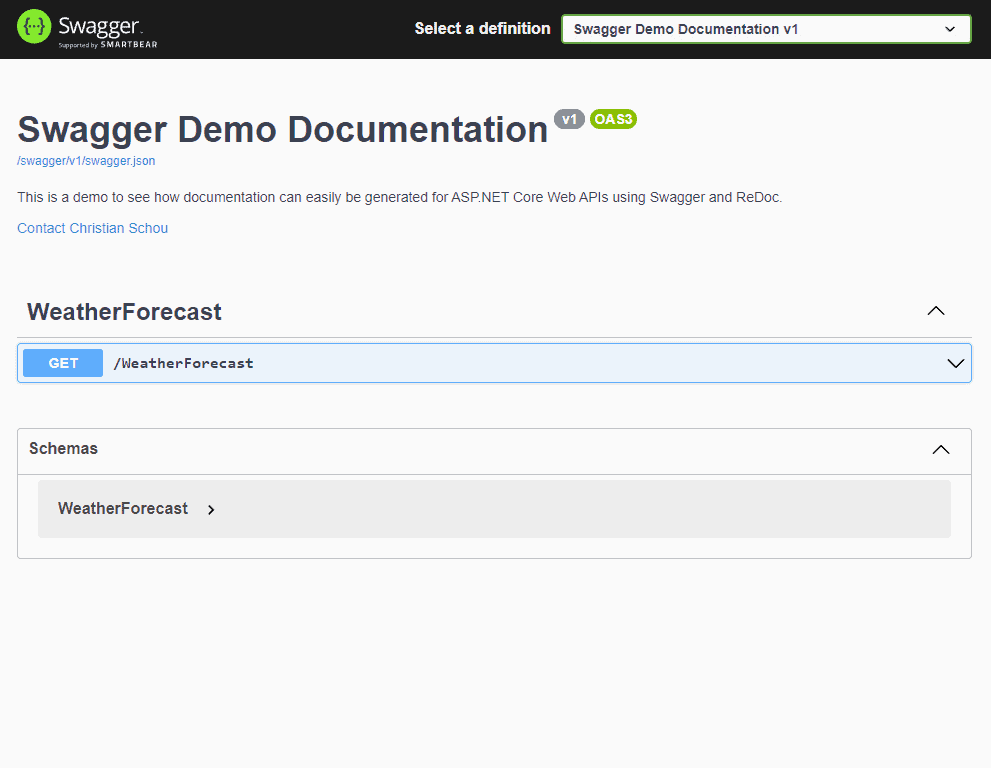
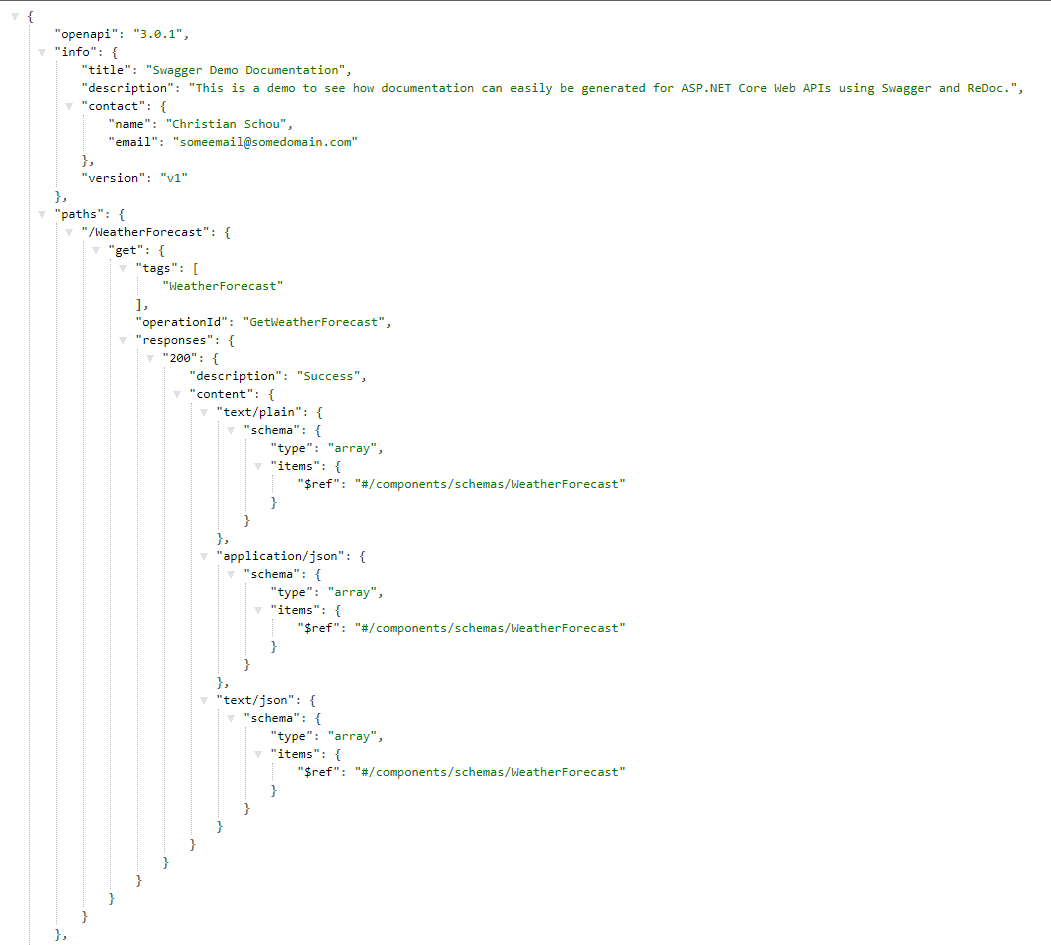
Swagger frontend and JSON definition
Awesome! It seems to work, let's use the newly configured swagger.json endpoint to generate our ReDoc documentation page for our API.
Configure ReDoc
It’s very easy to get ReDoc up and running. We have already installed the necessary package so let’s include it in our program.cs file to make use of it.
using Microsoft.OpenApi.Models;

var builder = WebApplication.CreateBuilder(args);

// Add services to the container.

builder.Services.AddControllers();
// Learn more about configuring Swagger/OpenAPI at https://aka.ms/aspnetcore/swashbuckle
builder.Services.AddEndpointsApiExplorer();
builder.Services.AddSwaggerGen(options =>
{
    options.SwaggerDoc("v1",
        new OpenApiInfo
        {
            Title = "Swagger Demo Documentation",
            Version = "v1",
            Description = "This is a demo to see how documentation can easily be generated for ASP.NET Core Web APIs using Swagger and ReDoc.",
            Contact = new OpenApiContact
            {
                Name = "Christian Schou",
                Email = "someemail@somedomain.com"
            }
        });
});

var app = builder.Build();

// Configure the HTTP request pipeline.
if (app.Environment.IsDevelopment())
{
    app.UseSwagger();
    app.UseSwaggerUI(options =>
    options.SwaggerEndpoint("/swagger/v1/swagger.json",
    "Swagger Demo Documentation v1"));

    app.UseReDoc(options =>
    {
        options.DocumentTitle = "Swagger Demo Documentation";
        options.SpecUrl = "/swagger/v1/swagger.json";
    });
}

app.UseHttpsRedirection();

app.UseAuthorization();

app.MapControllers();

app.Run();
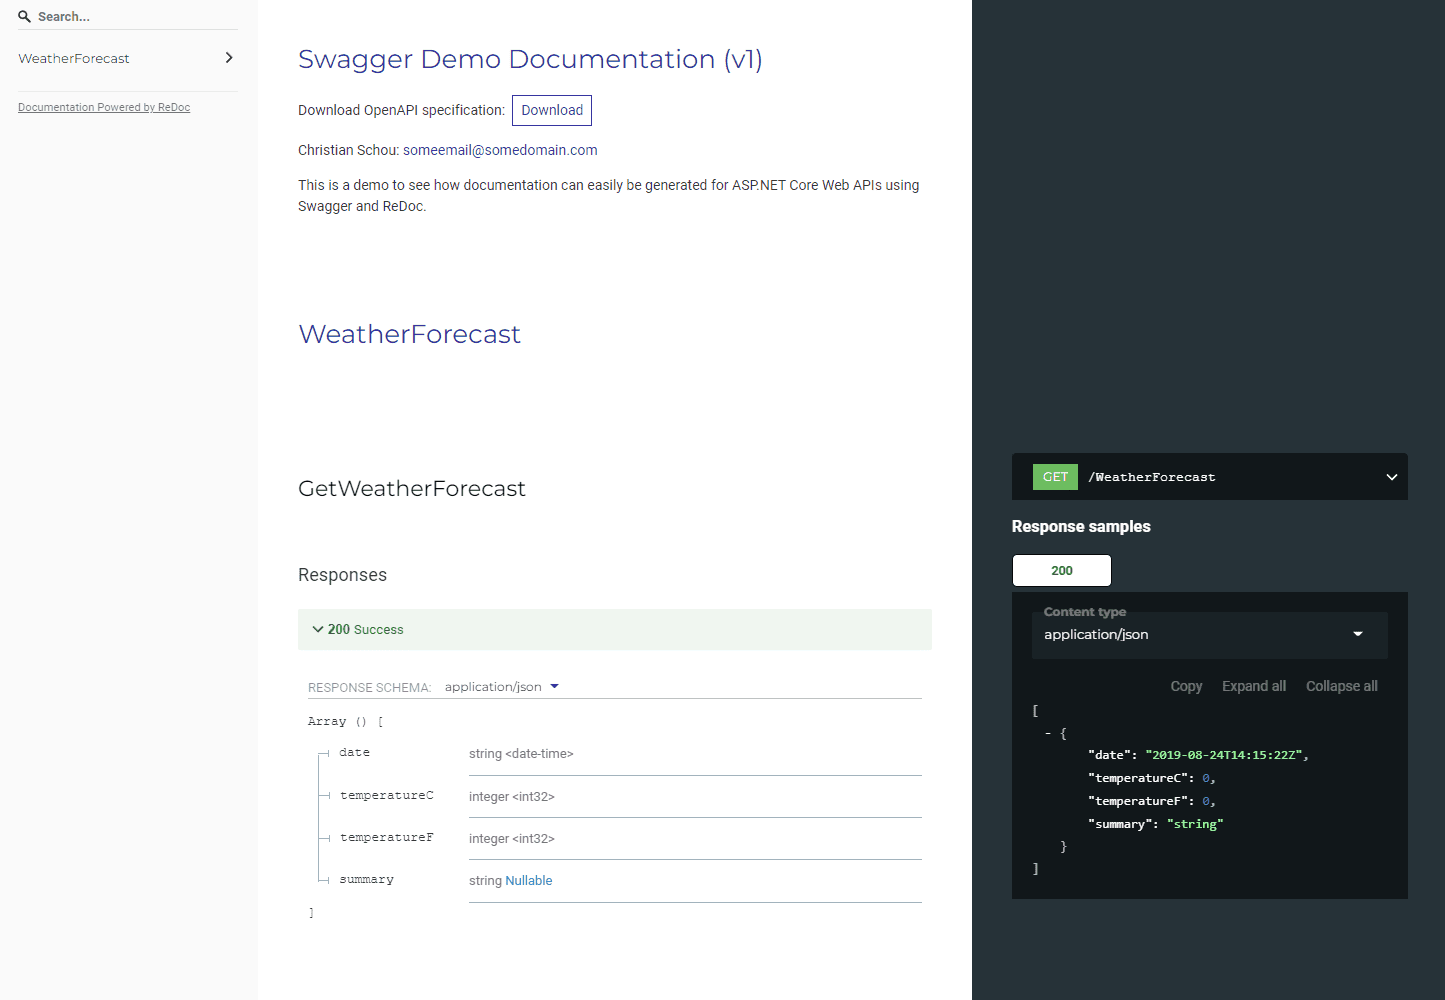
Now run the application again and navigate to https://your-host-and-port/api-docs/ – here you should now see the ReDoc documentation page. Screenshot below:
Use ReDoc as the default startup page
You can change your URL in two ways. The first one is to open launchSettings.json located in the Properties folder and change the property named "launchUrl" from "swagger " to "api-docs". The other one is by launching the debug profiles UI. See the below video to see how it can be done:
Your launch file would look like mine below. In line 15 I have updated the launchURL to be api-docs instead of Swagger.
{
  "$schema": "https://json.schemastore.org/launchsettings.json",
  "iisSettings": {
    "windowsAuthentication": false,
    "anonymousAuthentication": true,
    "iisExpress": {
      "applicationUrl": "http://localhost:38382",
      "sslPort": 44357
    }
  },
  "profiles": {
    "SwaggerDocsDemo": {
      "commandName": "Project",
      "launchBrowser": true,
      "launchUrl": "api-docs",
      "environmentVariables": {
        "ASPNETCORE_ENVIRONMENT": "Development"
      },
      "applicationUrl": "https://localhost:7173;http://localhost:5173",
      "dotnetRunMessages": true
    },
    "IIS Express": {
      "commandName": "IISExpress",
      "launchBrowser": true,
      "launchUrl": "swagger",
      "environmentVariables": {
        "ASPNETCORE_ENVIRONMENT": "Development"
      }
    }
  }
}
Publish Swagger and ReDoc when running in Production mode
If you would like to use ReDoc and Swagger when running the application in production, simply copy the code from the if statement checking if the app is running in debug mode, and paste it below the if statement, like below:
var app = builder.Build();

// Configure the HTTP request pipeline.
if (app.Environment.IsDevelopment())
{

}

app.UseSwagger();
app.UseSwaggerUI(options =>
options.SwaggerEndpoint("/swagger/v1/swagger.json",
"Swagger Demo Documentation v1"));

app.UseReDoc(options =>
{
    options.DocumentTitle = "Swagger Demo Documentation";
    options.SpecUrl = "/swagger/v1/swagger.json";
});

app.UseHttpsRedirection();

app.UseAuthorization();

app.MapControllers();

app.Run();
Add support for XML comments with Swagger
I like to edit the properties of the project in the .csproj file – if you would like to do it through the GUI, be my guest. To generate the documentation file for Swagger, we have to include this line of code in our <projectName>.csproj file. Right-click on the project and selectEdit Project File.
<Project Sdk="Microsoft.NET.Sdk.Web">

  <PropertyGroup>
    <TargetFramework>net6.0</TargetFramework>
    <Nullable>enable</Nullable>
    <ImplicitUsings>enable</ImplicitUsings>
    <GenerateDocumentationFile>true</GenerateDocumentationFile>
  </PropertyGroup>

  <ItemGroup>
    <PackageReference Include="Swashbuckle.AspNetCore" Version="6.2.3" />
    <PackageReference Include="Swashbuckle.AspNetCore.Newtonsoft" Version="6.2.3" />
    <PackageReference Include="Swashbuckle.AspNetCore.ReDoc" Version="6.2.3" />
  </ItemGroup>

</Project>
Now we have to include this documentation file in SwaggerGen() in program.cs.
builder.Services.AddControllers();
// Learn more about configuring Swagger/OpenAPI at https://aka.ms/aspnetcore/swashbuckle
builder.Services.AddEndpointsApiExplorer();
builder.Services.AddSwaggerGen(options =>
{
    options.SwaggerDoc("v1",
        new OpenApiInfo
        {
            Title = "Swagger Demo Documentation",
            Version = "v1",
            Description = "This is a demo to see how documentation can easily be generated for ASP.NET Core Web APIs using Swagger and ReDoc.",
            Contact = new OpenApiContact
            {
                Name = "Christian Schou",
                Email = "someemail@somedomain.com"
            }
        });

    var xmlFile = $"{Assembly.GetExecutingAssembly().GetName().Name}.xml";
    var xmlPath = Path.Combine(AppContext.BaseDirectory, xmlFile);
    options.IncludeXmlComments(xmlPath);
});
On lines 19 – 20 I have added two variables for getting the generated Documentation file for the current assembly and setting the path using the base directory. Line 21 is the one telling SwaggerGen() to include the XML comments generated at startup for Swagger.
Add XML Comments on actions in controllers
Now we can go ahead and implement comments on our controllers. In the example below I’m adding XML comments to the default Get action in the WeatherForecast controller in the template.
using Microsoft.AspNetCore.Mvc;

namespace SwaggerDocsDemo.Controllers
{

    /// <summary>
    /// Weather Forecasts
    /// </summary>
    [ApiController]
    [Route("[controller]")]
    public class WeatherForecastController : ControllerBase
    {
        private static readonly string[] Summaries = new[]
        {
        "Freezing", "Bracing", "Chilly", "Cool", "Mild", "Warm", "Balmy", "Hot", "Sweltering", "Scorching"
    };

        private readonly ILogger<WeatherForecastController> _logger;

        /// <summary>
        /// Constructor for Dependency Injection
        /// </summary>
        /// <param name="logger"></param>
        public WeatherForecastController(ILogger<WeatherForecastController> logger)
        {
            _logger = logger;
        }


        /// <summary>
        /// Return 5 random weather forecasts
        /// </summary>
        /// <remarks>
        /// This endpoint will return 5 days of weather forecasts with random temperatures in celcius.
        /// </remarks>
        /// <returns>5 Weather forecasts</returns>
        /// <response code="200">Returns the weather forecasts</response>
        [HttpGet(Name = "GetWeatherForecast")]
        [ProducesResponseType(StatusCodes.Status200OK)]
        public IEnumerable<WeatherForecast> Get()
        {
            return Enumerable.Range(1, 5).Select(index => new WeatherForecast
            {
                Date = DateTime.Now.AddDays(index),
                TemperatureC = Random.Shared.Next(-20, 55),
                Summary = Summaries[Random.Shared.Next(Summaries.Length)]
            })
            .ToArray();
        }
    }
}
Adding annotations to your controller actions
We have already installed the package Swachbuckle.AspNetCore.Annotation – let’s use it to make some more documentation for our api-docs. Go to your SwaggerGen() method and enable annotations, like I have done below at line 19:
builder.Services.AddSwaggerGen(options =>
{
    options.SwaggerDoc("v1",
        new OpenApiInfo
        {
            Title = "Swagger Demo Documentation",
            Version = "v1",
            Description = "This is a demo to see how documentation can easily be generated for ASP.NET Core Web APIs using Swagger and ReDoc.",
            Contact = new OpenApiContact
            {
                Name = "Christian Schou",
                Email = "someemail@somedomain.com"
            }
        });

    var xmlFile = $"{Assembly.GetExecutingAssembly().GetName().Name}.xml";
    var xmlPath = Path.Combine(AppContext.BaseDirectory, xmlFile);
    options.IncludeXmlComments(xmlPath);
    options.EnableAnnotations();
});
Enrich operation metadata on your controller actions
Swagger has a build-in annotation option in the package we can use to enrich operations data on the action. Let’s do that:
[HttpGet(Name = "GetWeatherForecast")]
[SwaggerOperation(
    Summary = "Get Weather Forecast",
    Description = "This endpoint will return 5 days of weather forecasts with random temperatures in celcius.",
    OperationId = "Get",
    Tags = new[] {"WeatherForecast"})]
public IEnumerable<WeatherForecast> Get()
{
    return Enumerable.Range(1, 5).Select(index => new WeatherForecast
    {
        Date = DateTime.Now.AddDays(index),
        TemperatureC = Random.Shared.Next(-20, 55),
        Summary = Summaries[Random.Shared.Next(Summaries.Length)]
    })
    .ToArray();
}
As you can see I have removed the response types, let’s add them again using Swagger response types:
Enrich response metadata on your controller actions
Swagger got an attribute named SwaggerResponse, allowing us to define the response types supplied with descriptions and types. Below is a quick example of just that:
[HttpGet(Name = "GetWeatherForecast")]
[SwaggerOperation(
    Summary = "Get Weather Forecast",
    Description = "This endpoint will return 5 days of weather forecasts with random temperatures in celcius.",
    OperationId = "Get",
    Tags = new[] {"WeatherForecast"})]
[SwaggerResponse(200, "The random weather forecasts", typeof(WeatherForecast))]
public IEnumerable<WeatherForecast> Get()
{
    return Enumerable.Range(1, 5).Select(index => new WeatherForecast
    {
        Date = DateTime.Now.AddDays(index),
        TemperatureC = Random.Shared.Next(-20, 55),
        Summary = Summaries[Random.Shared.Next(Summaries.Length)]
    })
    .ToArray();
}
Enrich request body metadata on controller actions of type POST, PUT and DELETE
You can annotate the parameters for the body using a SwaggerRequestBodyAttribute to enrich the metadata in the request body, generated by Swashbuckle.
Add a new class named Order.cs in the root of your project and paste the following code –only for demo purposes, remember to update your namespace.
namespace SwaggerDocsDemo
{
    public class Order
    {
        public int Id { get; set; }
        public int OrderId { get; set; }
        public string? CustomerName { get; set; }
        public string? Address { get; set; }
        public string? OrderValue { get; set; }
    }
}
We are just going to reuse the weather forecast controller and implement a new action that will accept a POST request for an Order and return it back to the client.
Create a new action named AddOrder that takes in a new Order object, like below:
[HttpPost]
public ActionResult<Order> AddOrder(Order order)
{
    return StatusCode(StatusCodes.Status200OK, order);
}
Now it’s time for some annotations on the body data. We can do that with the attribute [FromBody], as I have done below:
[HttpPost("AddOrder")]
[SwaggerOperation(
    Summary = "Add a new order to the API",
    Description = "This endpoint will take in a new order and return it to the client.",
    OperationId = "AddOrder",
    Tags = new[] { "Order" })]
[SwaggerResponse(200, "The posted order payload", type: typeof(Order))]
public ActionResult<Order> AddOrder([FromBody, SwaggerRequestBody("The order payload", Required = true)]Order order)
{
    return StatusCode(StatusCodes.Status200OK, order);
}
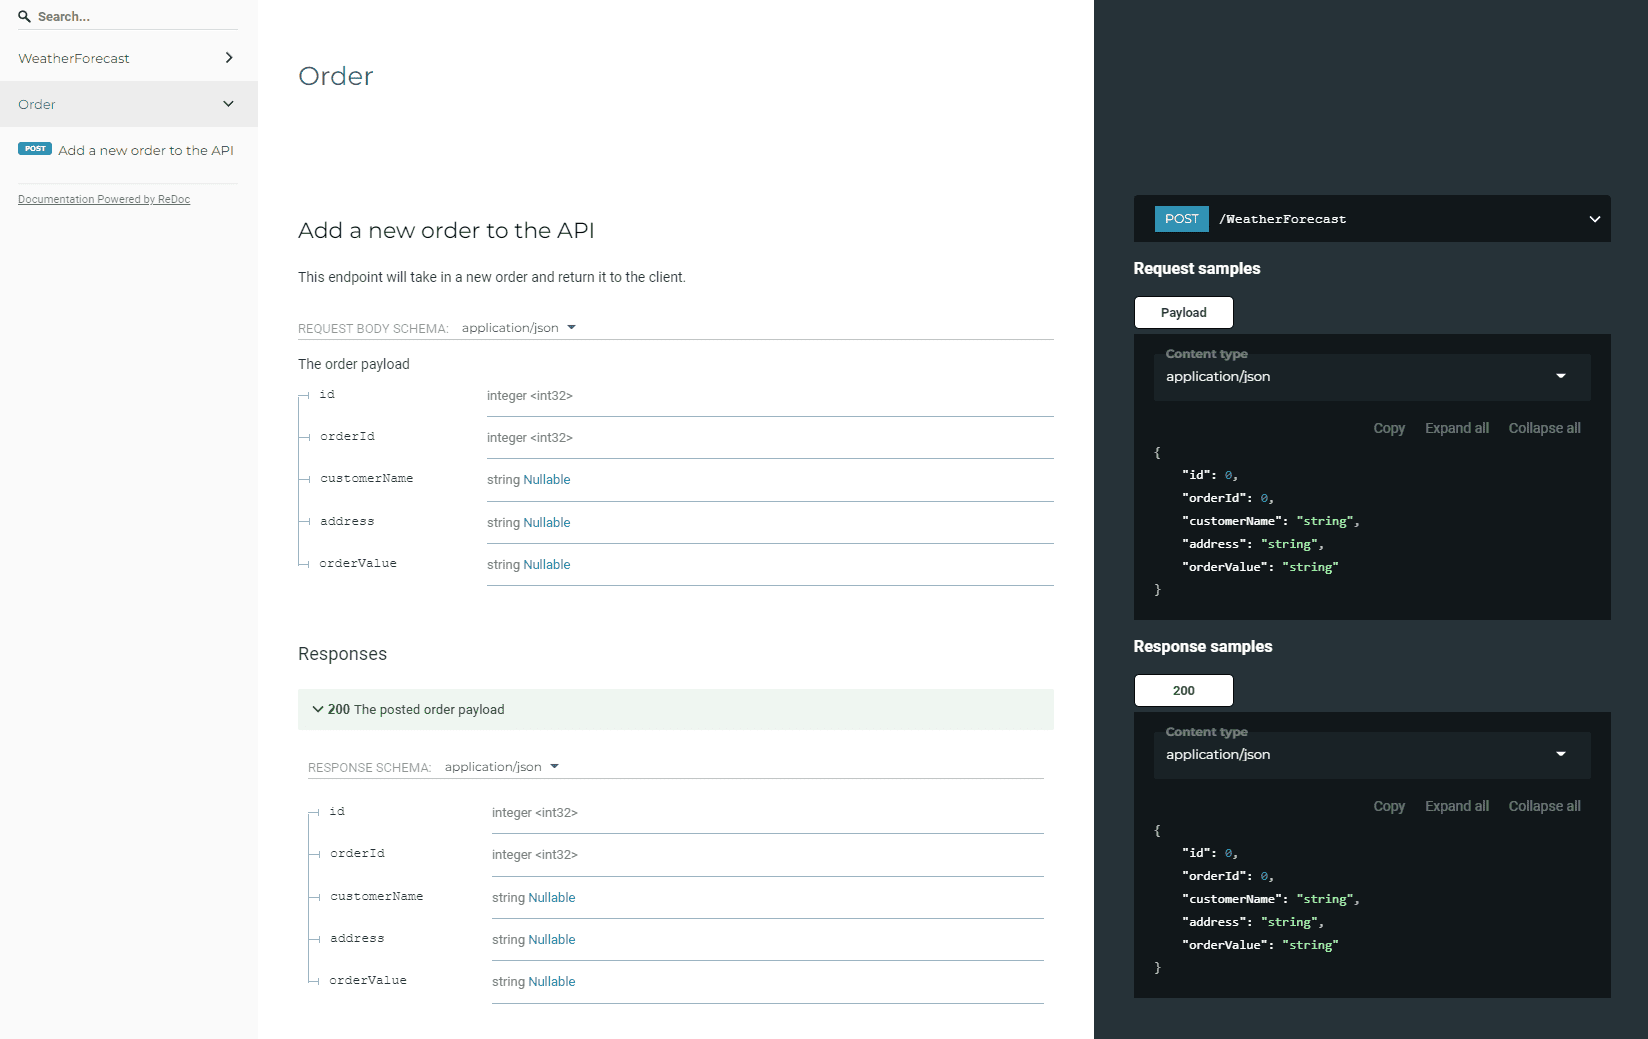
In the tags operation attribute, I wrote “Order”, this will change the API documentation to show a new section named order, where this request will be shown. It will look like the following when running:
Enrich parameter metadata when having parameters
Let’s add a new controller accepting a GET request and decorate it with annotations for the parameters. By default, you are able to annotate the path, query, and header. These are decorated with [FromRoute], [FromQuery], [FromHeader] using the SwaggerParameterAttribute.
You can name the request GetOrder(int orderId). We will be using the Order model we just created before to make a list with two orders and return the order specified by the ID when requested at the endpoint.
[HttpGet("GetOrder")]
public ActionResult<Order> GetOrder(int orderId)
{
    List<Order> orders = new List<Order>();

    orders.Add(new Order
    {
        Id = 1,
        OrderId = 8427,
        CustomerName = "Christian Schou",
        Address = "Some Address here",
        OrderValue = "87429,8236 DKK"
    });
    orders.Add(new Order
    {
        Id = 1,
        OrderId = 3265,
        CustomerName = "John Doe",
        Address = "Johns address here",
        OrderValue = "236,255 DKK"
    });

    return StatusCode(StatusCodes.Status200OK, orders.FirstOrDefault(x => x.OrderId == orderId));

}
Now we will enrich the action using the attribute [FromQuery]. I know that there is no checking that the order id really exists etc… but this is also only for demonstrating how you can decorate your request parameters.:
/// <summary>
/// Get an order by Order ID
/// </summary>
/// <param name="orderId"></param>
/// <returns>The order object</returns>
[HttpGet("GetOrder")]
[SwaggerOperation(
    Summary = "Get an order by Order ID",
    Description = "Use the endpoint to request an order by it's Order ID.",
    OperationId = "GetOrder",
    Tags = new[] {"Order"})]
[SwaggerResponse(200, "The requested order", type: typeof(Order))]
public ActionResult<Order> GetOrder([FromQuery, SwaggerParameter("Order ID", Required = true)]int orderId)
{
    List<Order> orders = new List<Order>();

    orders.Add(new Order
    {
        Id = 1,
        OrderId = 8427,
        CustomerName = "Christian Schou",
        Address = "Some Address here",
        OrderValue = "87429,8236 DKK"
    });
    orders.Add(new Order
    {
        Id = 1,
        OrderId = 3265,
        CustomerName = "John Doe",
        Address = "Johns address here",
        OrderValue = "236,255 DKK"
    });

    return StatusCode(StatusCodes.Status200OK, orders.FirstOrDefault(x => x.OrderId == orderId));
}
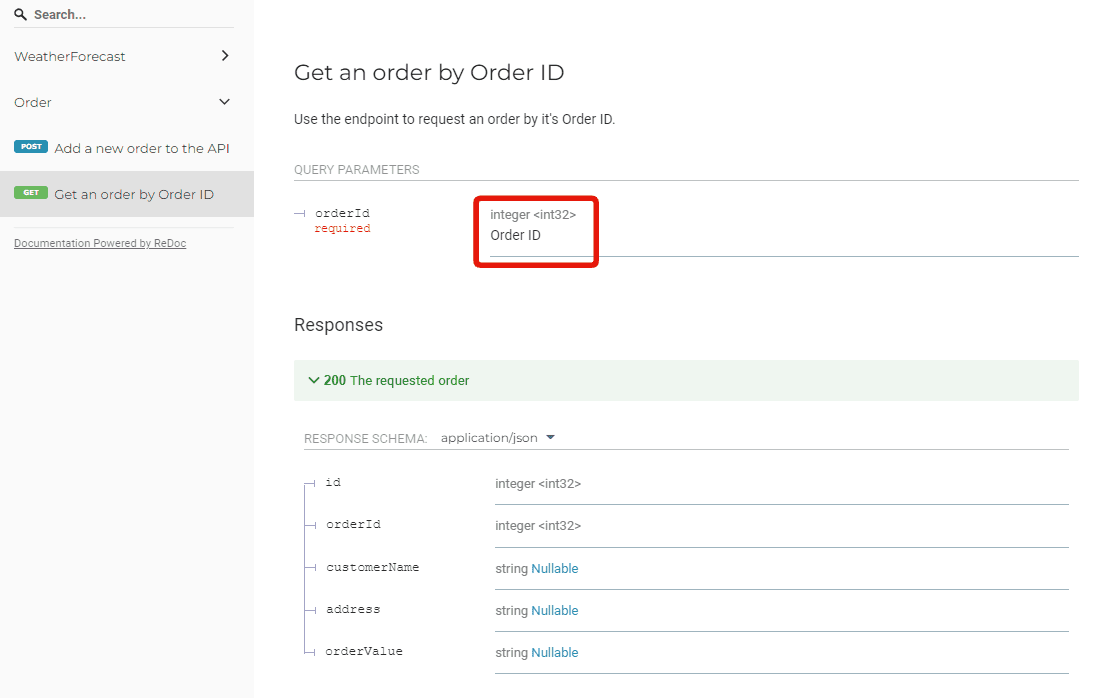
The result should give the parameter a description when reading the docs:
Add SwaggerTag to the controller
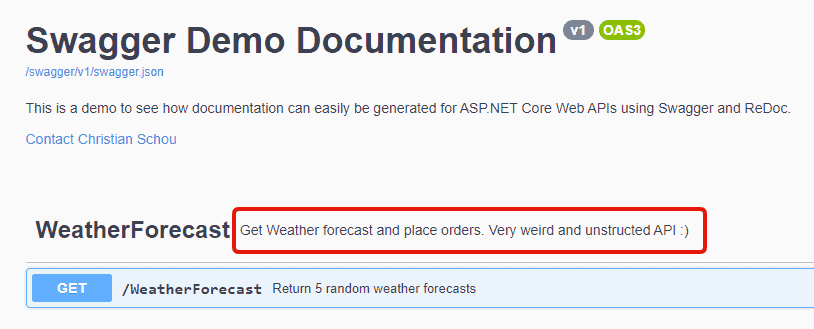
To decorate a controller, we can use the [SwaggerTag] attribute. This would give a description on the documentation page for the endpoint.
/// <summary>
/// Weather Forecasts
/// </summary>
[ApiController]
[Route("[controller]")]
[SwaggerTag("Get Weather forecast and place orders. Very weird and unstructed API :)")]
public class WeatherForecastController : ControllerBase
{
    private static readonly string[] Summaries = new[]
    {
    "Freezing", "Bracing", "Chilly", "Cool", "Mild", "Warm", "Balmy", "Hot", "Sweltering", "Scorching"
};
When running the application we get:

Great, let’s try to enrich the schema for Orders and Weather Forecasts.
Enrich Schema metadata using SwaggerSchema
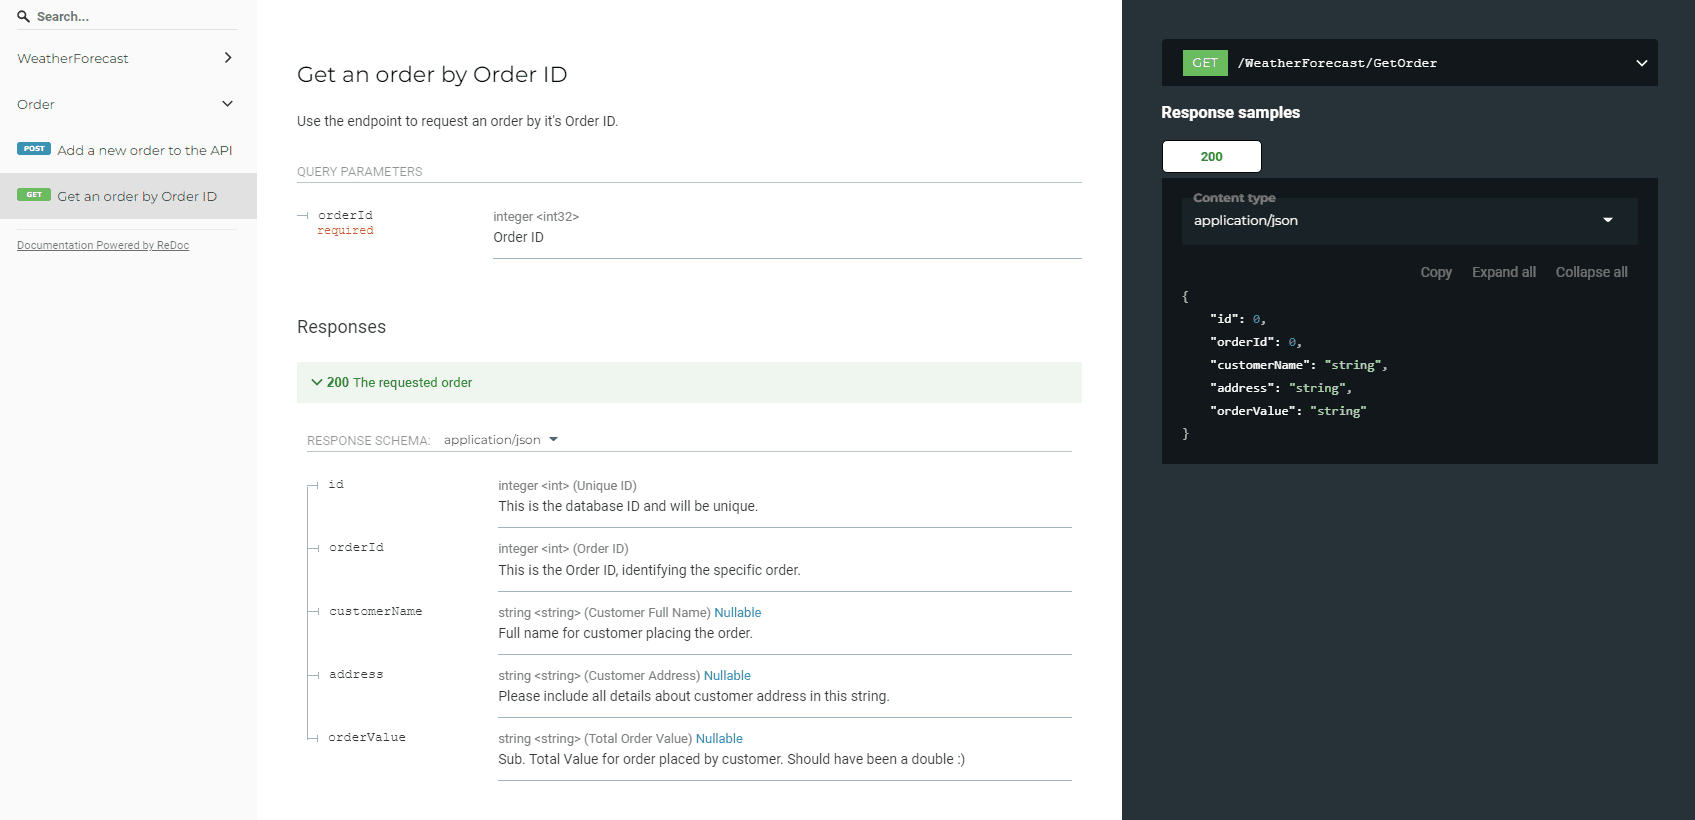
Using [SwaggerSchema] on our models will automatically populate metadata on the parameters in the documentation. This is a great way to add a summary and description to a model shown in the schema data in the API docs.
Go to Order.cs and add the following attributes:
using Swashbuckle.AspNetCore.Annotations;

namespace SwaggerDocsDemo
{
    /// <summary>
    /// Order Model
    /// </summary>
    [SwaggerSchema(Required = new[] {"Id", "OrderId", "CustomerName", "Address", "OrderValue"})]
    public class Order
    {
        [SwaggerSchema(
            Title = "Unique ID",
            Description = "This is the database ID and will be unique.",
            Format = "int")]
        public int Id { get; set; }

        [SwaggerSchema(
            Title = "Order ID",
            Description = "This is the Order ID, identifying the specific order.",
            Format = "int")]
        public int OrderId { get; set; }

        [SwaggerSchema(
            Title = "Customer Full Name",
            Description = "Full name for customer placing the order.",
            Format = "string")]
        public string? CustomerName { get; set; }

        [SwaggerSchema(
            Title = "Customer Address",
            Description = "Please include all details about customer address in this string.",
            Format = "string")]
        public string? Address { get; set; }

        [SwaggerSchema(
            Title = "Total Order Value",
            Description = "Sub. Total Value for order placed by customer. Should have been a double :)",
            Format = "string")]
        public string? OrderValue { get; set; }
    }
}
Let’s launch our application and check the docs to verify that the metadata was added to our schema for an Order.
Add Logo to your ReDoc documentation page
To accomplish this we have to use the extensions feature in SwaggerGen() to tell ReDoc that it should use a custom logo for the ReDoc page. Please notice that I use a relative path for the image. If you would like this to work when you publish the solution, you have to change the properties for the image and tell Visual Studio to copy it at publish.
Below is an update to our SwaggerGen() code block to include the image. Copy the lines from 14 - 22:
builder.Services.AddSwaggerGen(options =>
{
    options.SwaggerDoc("v1",
        new OpenApiInfo
        {
            Title = "Swagger Demo Documentation",
            Version = "v1",
            Description = "This is a demo to see how documentation can easily be generated for ASP.NET Core Web APIs using Swagger and ReDoc.",
            Contact = new OpenApiContact
            {
                Name = "Christian Schou",
                Email = "someemail@somedomain.com"
            },
            Extensions = new Dictionary<string, IOpenApiExtension>
            {
              {"x-logo", new OpenApiObject
                {
                   {"url", new OpenApiString("https://christian-schou.dk/wp-content/uploads/2021/09/cropped-cs-logo-color-retina.png")},
                   { "altText", new OpenApiString("Your logo alt text here")}
                }
              }
            }
        });

    var xmlFile = $"{Assembly.GetExecutingAssembly().GetName().Name}.xml";
    var xmlPath = Path.Combine(AppContext.BaseDirectory, xmlFile);
    options.IncludeXmlComments(xmlPath);
    options.EnableAnnotations();
});
You can include a logo from a web server like I have done in the example above or you can place it within your solution and publish it when building the application. The result will look like this:
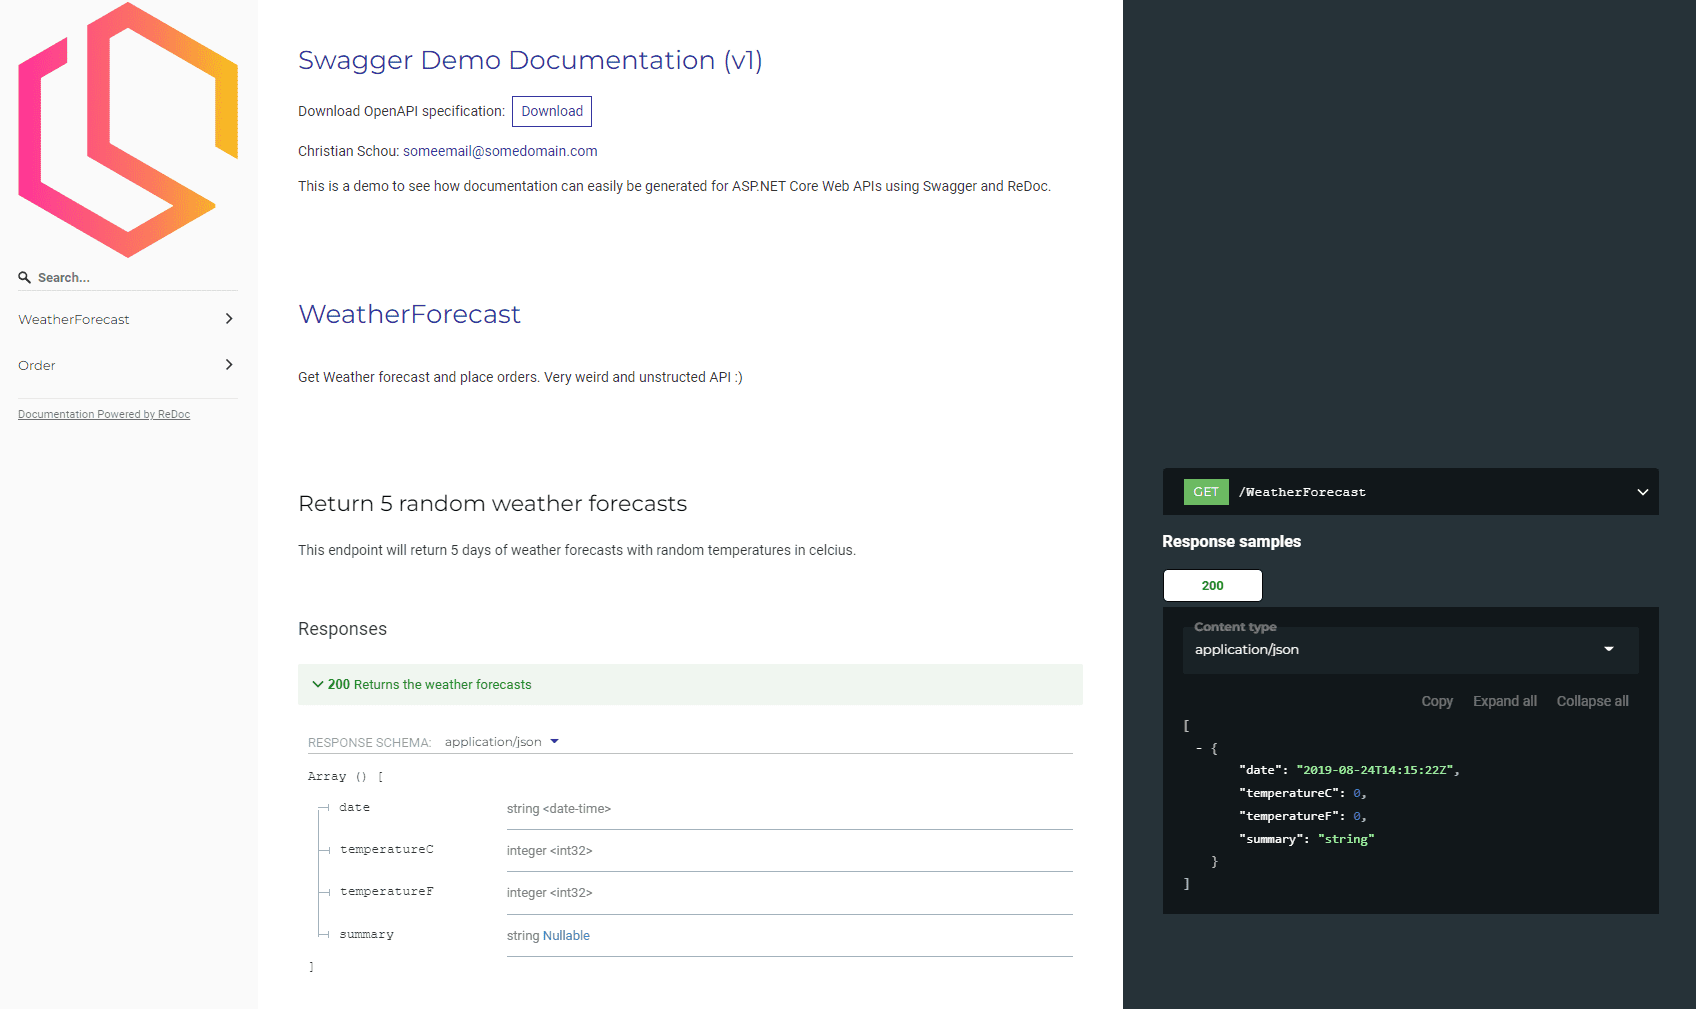
Awesome! Now we can also showcase our cool logo on the documentation page for our API.
Summary of how to make API documentation using Swagger
Swagger in combination with ReDoc is a very powerful way to rapidly generate API documentation using Swagger. If you add the attributes while you are writing the code, it will make it easier for you in the end to maintain the solution/project documentation.
Swagger and ReDoc are both offered as free (open-source) and in paid versions. I can live with the free version in many projects because they both offer so much. In this tutorial, you learned how to implement Swagger and ReDoc in an ASP.NET Core Web API built on .NET 6. You also learned how to work with annotations on your controller actions to enrich actions operations metadata and models to enrich the schema metadata.
If you got any issues, suggestions, questions, or anything else, please let me know in the comments section below. The solution is available on my Github (see below) – Happy coding!


