In this article, I will briefly discuss what CQRS is, some advantages and disadvantages of using this design pattern and then we will practically implement CQRS with MediatR in a demo project.
What is CQRS?
CQRS is an abbreviation of what we would refer to as Command Query Responsibility Segregation. CQRS is a design pattern that allows an application’s developers to separate the command and query logic easily. Below is a brief explanation of what I mean by Query and Command logic.
What is MediatR?
By adding MediatR to our application we can reduce dependencies between our objects making the application less coupled = easier to maintain. MediatR allows for in-process messaging (not allowing direct communication between objects). Every request contains a handler. The handler is the one responsible for processing the request sent from the service calling MediatR. Each request sent to MediatR is assigned its very own handler. Below is a very simple diagram I have made to illustrate the concept of using MediatR.
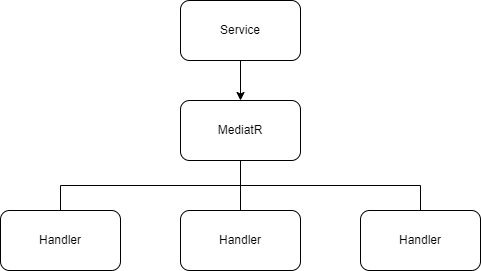
Query and Command logic
Before we deep-dive into the actual implementation I would like to make sure we are both on the same side when talking about queries and commands in the application.
Queries
When we do a query against a database, we would like to retrieve a set of data we can work with. A standard select query looks like the following:
SELECT Name, Age FROM UsersCommands
When dealing with the CQRS pattern, standard commands are Insert, Update, and Delete commands. This kind of logic is placed at the business level in the application separating it from the other layers. Because they are business operations, they will not return any data in the application. Below are three examples of the above-mentioned commands in plain SQL.
Insert
The insert command will always add new data to our database. This can be achieved with the following command:
INSERT INTO Users (Id, Name, Age)
VALUES(3, 'Christian', 26)
Update
Update commands will take the Key Identifier and update the data in relation to that key. If we were to update the second user in our database, an update command would look like the following.
UPDATE Users
SET Name = 'Kenya'
WHERE Id = 1
Delete
If we would like to get rid of some data we would perform a delete command. Let’s say we would like to remove the user with id 4 from our database.
DELETE FROM Users
WHERE Id = 4
Pros and Cons of Using CQRS and MediatR
Pros of CQRS
- If you run an application with a lot of database transactions, you want to make sure that these transactions would run as fast as possible – optimization first. When you implement CQRS in your application each of the queries and commands would be assigned their own handler. CQRS comes in handy as each statement is easier to optimize as we separate each query (get) and command (insert, update, delete).
- CQRS makes the code easier to write as it takes out the complexity because we can separate the handlers resulting in less complex joins and business operations.
- If you were to introduce new developers to the application it would be easier for them to get on board as the commands and queries have been separated into smaller bits.
- If you got a huge application and the business model is complex you can assign the developers to separate parts of the business logic. This would mean that a set of developers would only be working on the queries, and another set of developers would only work on either INSERT, UPDATE or DELETE commands.
Cons of CQRS
If you run a simple small application it might be overkill, as I think it would raise the complexity of the application too much. Also when the business logic is non-complex, CQRS can be skipped (in my opinion).
Pros of MediatR
- Your application will be easier to maintain and new developers will be easier to onboard as the onboarding would require less time and resources.
- Ever had/maintained an application with a shit ton of dependency injection because you got some heavy coupling? MediatR makes it possible to only reference the MediatR class and will reduce the coupling between the controller and the services they invoke.
- If you need it you can easier apply new or different configurations in your project without having to change a lot of code which can be very time-consuming.
Implement CQRS using MediatR in an ASP.NET Core Web API
Start by creating a new project based on the ASP.NET Core Web API template in Visual Studio. In this demo, we will focus on movies. At the end of this article, we will be able to create new movies in our database or select new users from the database.
#1 – Create a new ASP.NET Core Web API
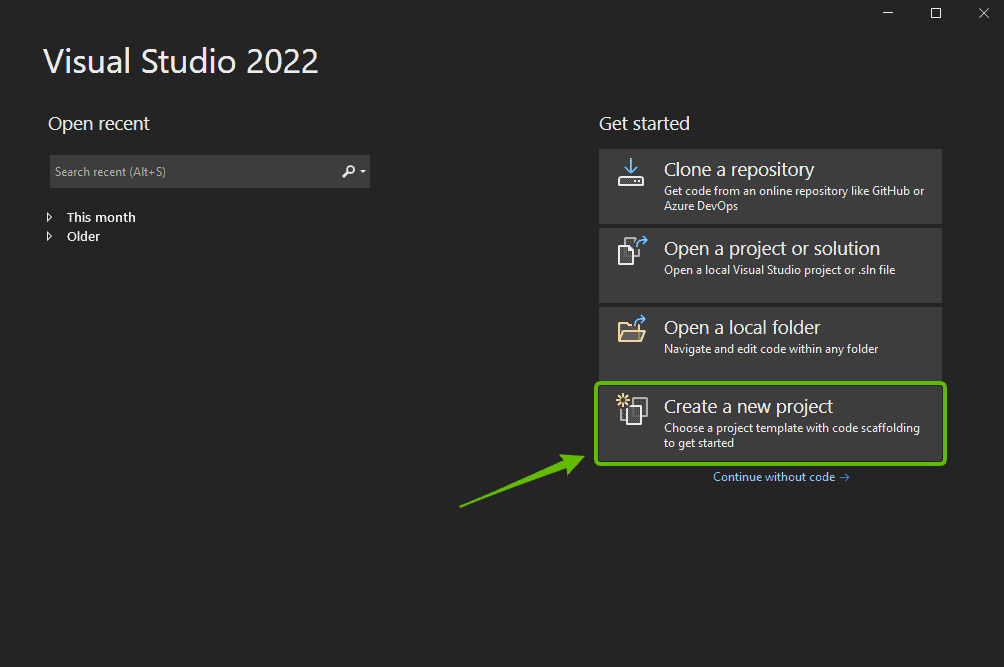
Follow the instructions and name the application just the way you want. I have enabled HTTPS support in mine and no docker support.
#2 – Initial Cleanup of API
Because the API is made using a template, we have to do some initial cleanup. The first thing we have to do is delete the Weather Forecast class and controller in our project.
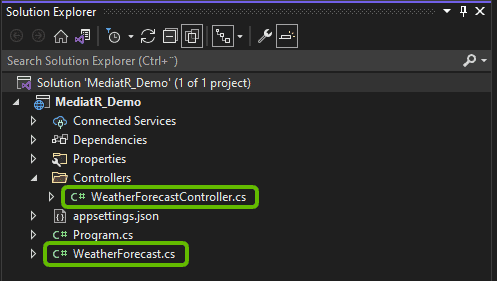
Let’s move on to creating the models and enums we are going to use. You can see the current changed files at this commit – Add project files.
#3 – Create Core and Domain Models
For demo purposes, I will not create this application using clean architecture separating the parts of the application into separate projects. Everything will be inside the API project.
First, we have to create a few folders. Follow this structure:
└───MediatR_Demo
    ├───Controllers
    ├───Core
    │   └───Enums
    ├───Domain
    │   └───Entities
    │       └───Movie
    └───Properties
Inside the Enums folder, create a new file named MovieGenre.cs and create one inside Movie named Movie.cs.
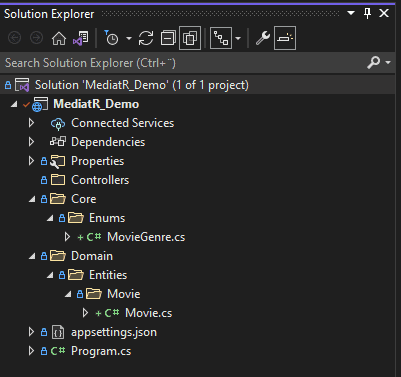
Our movie model /entity will be very basic for the demo. I have added the following properties to the movie model.
using MediatR_Demo.Core.Enums;

namespace MediatR_Demo.Domain.Entities.Movie
{
    public class Movie
    {
        public long Id { get; set; }
        public string? Title { get; set; }
        public string? Description { get; set; }
        public MovieGenre Genre { get; set; }
        public int? Rating { get; set; }
    }
}
The enum holding our movie genres looks like this:
namespace MediatR_Demo.Core.Enums
{
    public enum MovieGenre
    {
        Action,
        Comedy,
        Drama,
        Fantasy,
        Horror,
        Mystery,
        Romance,
        Thriller,
        Western
    }
}
You can see the changes I made for this part of the tutorial here:
#4 – Create and Migrate Database using EF Core
With our model in place, let’s move on to the part where we can store some data about the movies.
4.1 – Install required packages
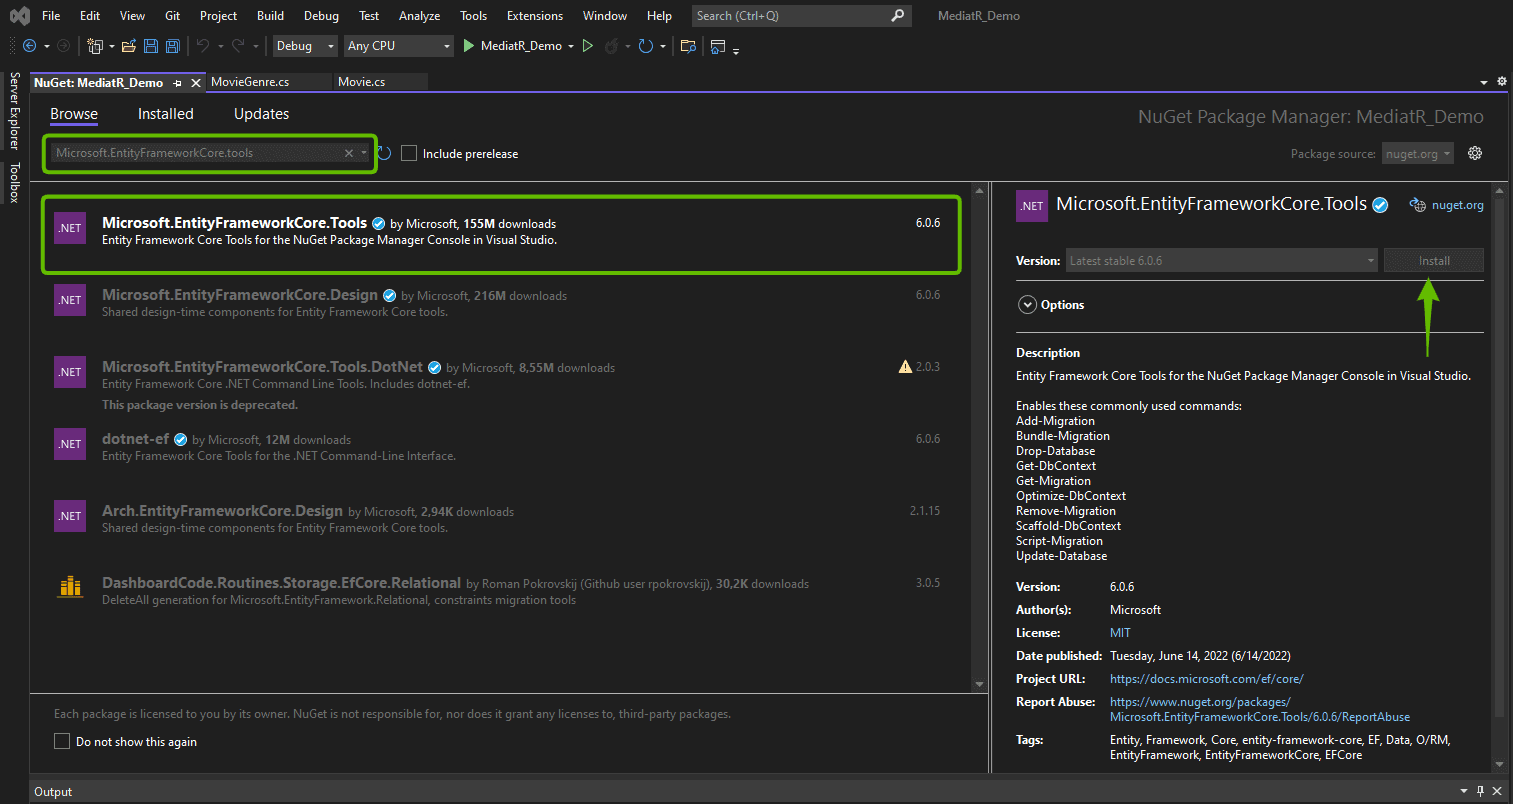
I will use Entity Framework Core (Code First) to connect and create the database for the application. The database is hosted on my local development machine. Let’s install the required packages using the NuGet Package Manager.
SQL Server
https://www.nuget.org/packages/Microsoft.EntityFrameworkCore.SqlServer/
### Package Manager
Install-Package Microsoft.EntityFrameworkCore.SqlServer

### .NET CLI
dotnet add package Microsoft.EntityFrameworkCore.SqlServer

### PackageReference
<PackageReference Include="Microsoft.EntityFrameworkCore.SqlServer" Version="VERSION-HERE" />
Tools
https://www.nuget.org/packages/Microsoft.EntityFrameworkCore.Tools
### Package Manager
Install-Package Microsoft.EntityFrameworkCore.Tools

### .NET CLI
dotnet add package Microsoft.EntityFrameworkCore.Tools

### PackageReference
<PackageReference Include="Microsoft.EntityFrameworkCore.Tools" Version="VERSION-HERE" />
EF Core
https://www.nuget.org/packages/Microsoft.EntityFrameworkCore
### Package Manager
Install-Package Microsoft.EntityFrameworkCore

### .NET CLI
dotnet add package Microsoft.EntityFrameworkCore

### PackageReference
<PackageReference Include="Microsoft.EntityFrameworkCore" Version="VERSION-HERE" />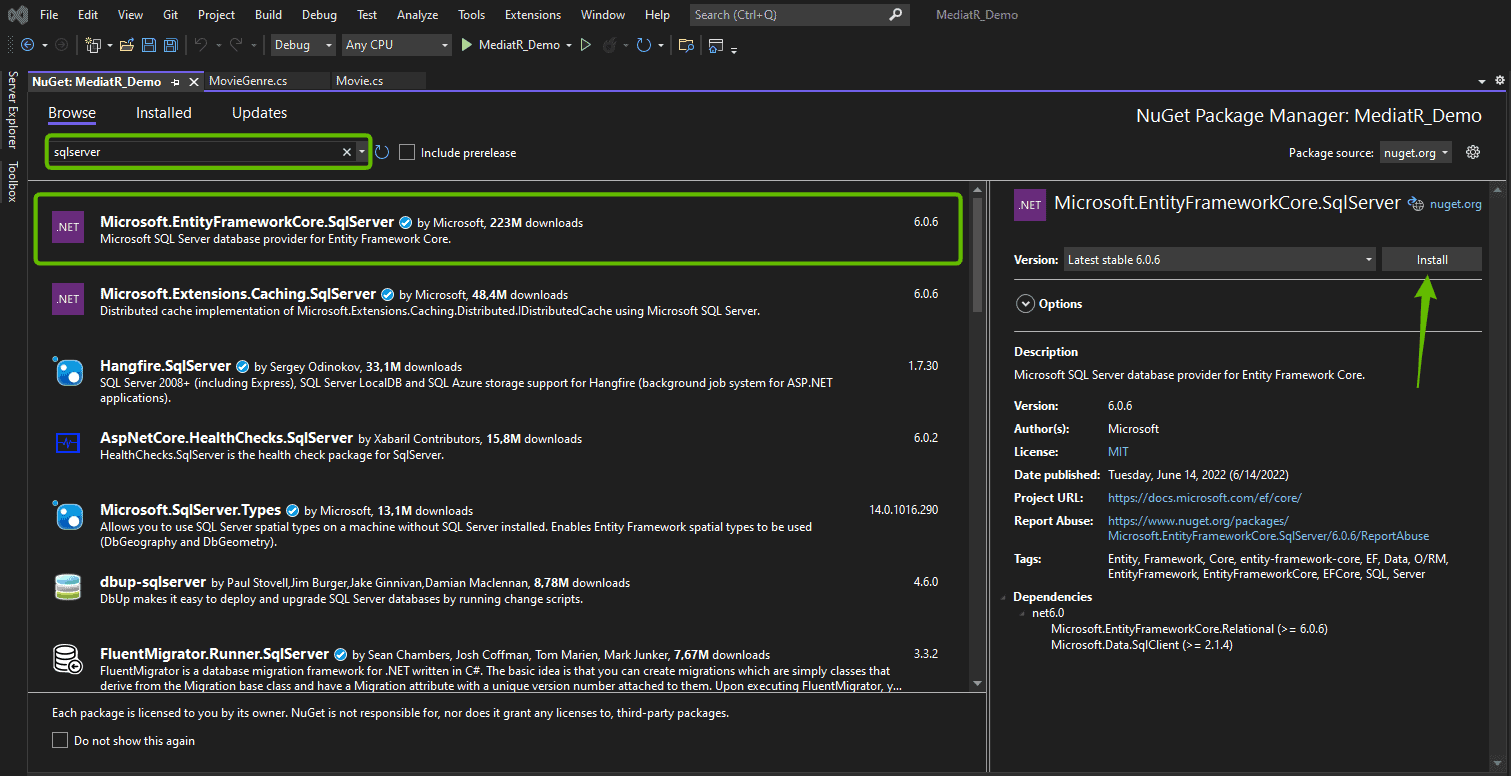
4.2 – Setup Database Connection
With the packages installed and ready to use, we have to configure the database connection string and tell our application to add a new database context at startup.
Go to appsettings.json and create a new section for your connection string. Mine looks like this using a trusted connection:
{
  "ConnectionStrings": {
    "Standard": "Server=localhost;Database=mediatr-demo;Trusted_Connection=True;"
  },
  "Logging": {
    "LogLevel": {
      "Default": "Information",
      "Microsoft.AspNetCore": "Warning"
    }
  },
  "AllowedHosts": "*"
}
Before we can register this in our startup class, we have to create a database context class for our application.
4.3 – Create Application Db Context
Create a new folder named Repository at the root level with a new subfolder named Context. Inside the Context folder, you have to add a new file named ApplicationDbContex.cs.
ApplicationDbContext.cs has to contain our Movie Model to address it in the database.
using MediatR_Demo.Domain.Entities.Movie;
using Microsoft.EntityFrameworkCore;

namespace MediatR_Demo.Repository.Context
{
    public class ApplicationDbContext : DbContext
    {
        public ApplicationDbContext(DbContextOptions<ApplicationDbContext> options) : base(options)
        {
        }

        public DbSet<Movie> Movies { get; set; }
    }
}
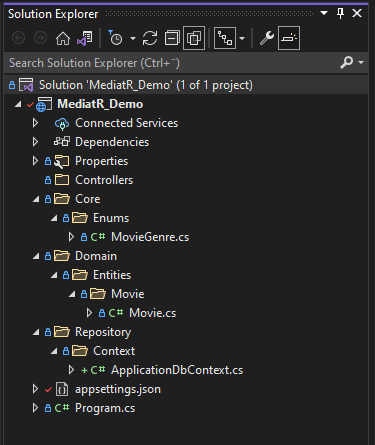
By now you should have an application structure that looks like this:
4.4 – Register Application Db Context with Connection String
Now we have to register our ApplicationDbContext class with the connection string we added to our appsettings.json file earlier.
Go to Program.cs and add the following:
using MediatR_Demo.Repository.Context;
using Microsoft.EntityFrameworkCore;

var builder = WebApplication.CreateBuilder(args);

// Add services to the container.

builder.Services.AddControllers();
// Learn more about configuring Swagger/OpenAPI at https://aka.ms/aspnetcore/swashbuckle
builder.Services.AddEndpointsApiExplorer();
builder.Services.AddSwaggerGen();
builder.Services.AddDbContext(
    options => options.UseSqlServer(builder.Configuration.GetConnectionString("Standard")));

var app = builder.Build();

// Configure the HTTP request pipeline.
if (app.Environment.IsDevelopment())
{
    app.UseSwagger();
    app.UseSwaggerUI();
}

app.UseHttpsRedirection();

app.UseAuthorization();

app.MapControllers();

app.Run();
4.5 – Migrate and Update Database
The only thing we have to do now is create a new migration and update the database.
Go to your Package Manager Console and run the following commands:
Add-Migration MovieAddedUpdate-Database
Let EF Core do its magic. Lean back and wait for a moment.
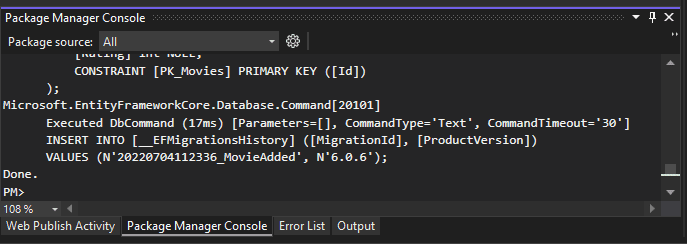
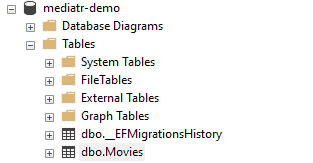
If we open up the database and expand the tables section, we should now be able to see a table with our migration history and the table holding our movies. Awesome!
You can see the changes to the code I made in the section of the article right here:
#5 – Install and Configure MediatR
So far we have created the required model to hold our movies, an enum with various genres for movies, and the database context for storing our movies. Let’s move on and populate some movies in our database.
To add new movies to the database, we have to create a command because it will be an INSERT command. Later I will show you how to query the database for retrieving the movies back.
To make it easier for ourselves when implementing the CQRS design pattern, we will be using MediatR. Let’s install MediatR in our project. First, we install MediatR and then a package that will allow us to wire up MediatR with ASP.NET DI.
MediatR
### Package Manager
Install-Package MediatR

### .NET CLI
dotnet add package MediatR

### PackageReference
<PackageReference Include="MediatR" Version="VERSION-HERE" />
DI Package
### Package Manager
Install-Package MediatR.Extensions.Microsoft.DependencyInjection

### .NET CLI
dotnet add package MediatR.Extensions.Microsoft.DependencyInjection

### PackageReference
<PackageReference Include="MediatR.Extensions.Microsoft.DependencyInjection" Version="VERSION-HERE" />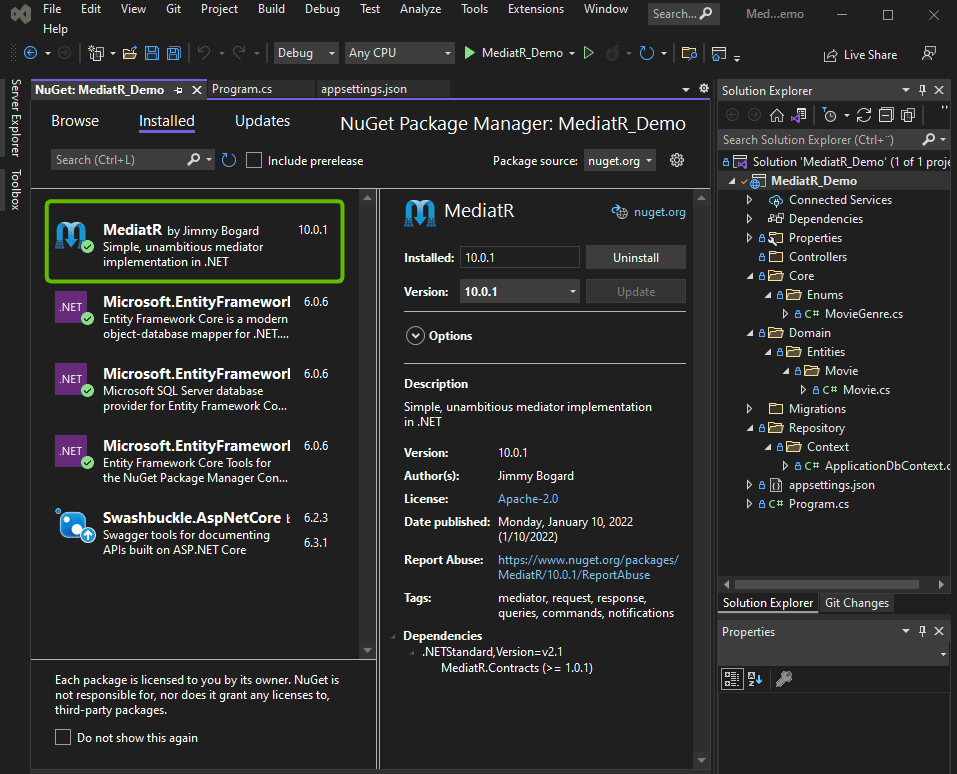
Go to Program.cs and add MediatR to the startup routine.
using MediatR;
using MediatR_Demo.Repository.Context;
using Microsoft.EntityFrameworkCore;

var builder = WebApplication.CreateBuilder(args);

// Add services to the container.

builder.Services.AddControllers();
// Learn more about configuring Swagger/OpenAPI at https://aka.ms/aspnetcore/swashbuckle
builder.Services.AddEndpointsApiExplorer();
builder.Services.AddSwaggerGen();
builder.Services.AddDbContext(
    options => options.UseSqlServer(builder.Configuration.GetConnectionString("Standard")));

builder.Services.AddMediatR(typeof(Program));

var app = builder.Build();

// Configure the HTTP request pipeline.
if (app.Environment.IsDevelopment())
{
    app.UseSwagger();
    app.UseSwaggerUI();
}

app.UseHttpsRedirection();

app.UseAuthorization();

app.MapControllers();

app.Run();
MediatR is now ready to work for us. Before we can launch the application, we have to make a small change to launchsettings.json. Update the launch URL to the following for the demo.
{
  "$schema": "https://json.schemastore.org/launchsettings.json",
  "iisSettings": {
    "windowsAuthentication": false,
    "anonymousAuthentication": true,
    "iisExpress": {
      "applicationUrl": "http://localhost:14989",
      "sslPort": 44321
    }
  },
  "profiles": {
    "MediatR_Demo": {
      "commandName": "Project",
      "dotnetRunMessages": true,
      "launchBrowser": true,
      "launchUrl": "swagger",
      "applicationUrl": "https://localhost:7001;http://localhost:7000",
      "environmentVariables": {
        "ASPNETCORE_ENVIRONMENT": "Development"
      }
    },
    "IIS Express": {
      "commandName": "IISExpress",
      "launchBrowser": true,
      "launchUrl": "swagger",
      "environmentVariables": {
        "ASPNETCORE_ENVIRONMENT": "Development"
      }
    }
  }
}
You can see the changes I made to the code here:
#6 – Create DTOs for Request and Response Abstraction
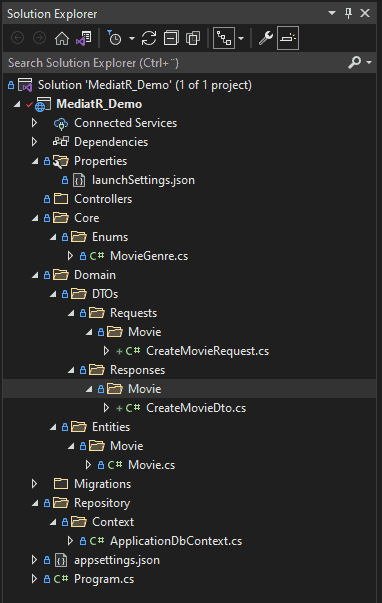
Our movie model takes a few strings and ints to describe a movie. To fill the movie table with movies, we have to fill out these data. To do this I will create data transfer objects (DTOs). Inside the Domain folder, I have created a new folder named DTOs.
As we will be both requesting and sending data, we will create two new folders (requests and responses) inside our DTO folder with subfolders for Movie. Inside each Movie folder you have to add a new file with the following names:
- CreateMovieRequest.cs
- CreateMovieDto.cs
6.1 – CreateMovieRequest.cs
using MediatR_Demo.Core.Enums;

namespace MediatR_Demo.Domain.DTOs.Requests.Movie
{
    public class CreateMovieRequest
    {
        public string? Title { get; set; }
        public string? Description { get; set; }
        public MovieGenre Genre { get; set; }
        public int? Rating { get; set; }
    }
}
6.2 – CreateMovieDto.cs
namespace MediatR_Demo.Domain.DTOs.Responses.Movie
{
    public class CreateMovieDto
    {
        public CreateMovieDto(long id)
        {
            Id = id;
        }

        public long Id { get; set; }
    }
}
In the next section, we will create the commands to insert new movies into our database. If you would like to see the changes I made to the code in this section, you can do it here:
#7 – Create Movie Commands + Movie Controller
Let’s fire up the DTOs and implement the insert command, handler, and extension to make our CQRS pattern work.
7.1 – Create Commands for creating a new movie
Create a new set of folders with the following structure: ./Application/Movies/Commands/CreateMovie.
Inside the folder named CreateMovie, you have to create three new files with the following names:
- CreateMovieCommand.cs
- CreateMovieCommandExtensions.cs
- CreateMovieCommandHandler.cs
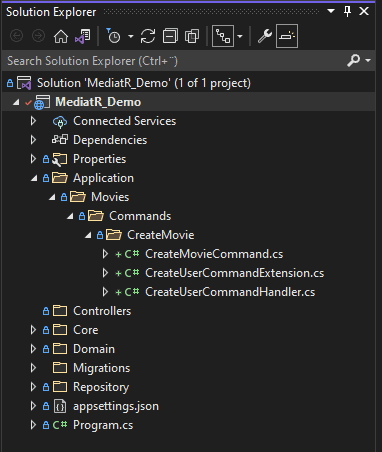
In the sub-sections, I will go over each file and show you the code you have to add to the respective file.
7.2 – CreateMovieCommand
Our command file will get the title, description, genre, and rating. These values will be returned to our CreateMovieDto which holds the Id of our created movie. Below is the implementation:
using MediatR;
using MediatR_Demo.Core.Enums;
using MediatR_Demo.Domain.DTOs.Responses.Movie;

namespace MediatR_Demo.Application.Movies.Commands.CreateMovie
{
    public class CreateMovieCommand : IRequest<CreateMovieDto>
    {
        public CreateMovieCommand(
            string title,
            string description,
            MovieGenre genre,
            int rating)
        {
            Title = title;
            Description = description;
            Genre = genre;
            Rating = rating;
        }

        public string? Title { get; set; }
        public string Description { get; set; }
        public int? Rating { get; set; }
        public MovieGenre? Genre { get;}
    }
}
7.3 – CreateMovieCommandExtensions
Next up are the extensions. Currently, we will only implement the logic for creating a movie. I have named the method CreateMovie – it takes in the CreateMovieCommand and returns the Movie model.
using MediatR_Demo.Domain.Entities.Movie;

namespace MediatR_Demo.Application.Movies.Commands.CreateMovie
{
    public static class CreateUserCommandExtension
    {
        public static Movie CreateMovie(this CreateMovieCommand command)
        {
            var movie = new Movie
                (
                    command.Title,
                    command.Description,
                    command.Genre,
                    command.Rating
                );

            return movie;
        }
    }
}
You will now get an error on the new Movie object because Movie doesn’t have a constructor. To solve this go back to your Movie model and update it to the following:
using MediatR_Demo.Core.Enums;

namespace MediatR_Demo.Domain.Entities.Movie
{
    public class Movie
    {
        public Movie(string? title, string? description, MovieGenre? genre, int? rating)
        {
            Title = title;
            Description = description;
            Genre = genre;
            Rating = rating;
        }

        public long Id { get; set; }
        public string? Title { get; set; }
        public string? Description { get; set; }
        public MovieGenre? Genre { get; set; }
        public int? Rating { get; set; }
    }
}
7.4 – CreateMovieCommandHandler
Now for one of the most important things – the handler to carry out the operations inserting the data into our database. This method is named Handle and takes in the CreateUserCommand (our request) and a cancellation token. When done it should return the ID of the created user.
using MediatR;
using MediatR_Demo.Domain.DTOs.Responses.Movie;
using MediatR_Demo.Repository.Context;

namespace MediatR_Demo.Application.Movies.Commands.CreateMovie
{
    public class CreateUserCommandHandler : IRequestHandler<CreateMovieCommand, CreateMovieDto>
    {
        private readonly ApplicationDbContext _dbContext;

        public CreateUserCommandHandler(ApplicationDbContext dbContext)
        {
            _dbContext = dbContext;
        }

        public async Task<CreateMovieDto> Handle(CreateMovieCommand request, CancellationToken cancellationToken)
        {
            var movie = request.CreateMovie();
            await _dbContext.Movies.AddAsync(movie);
            await _dbContext.SaveChangesAsync();

            return new CreateMovieDto(movie.Id);
        }
    }
}
We have not inherited the Handle method from the IRequestHandler interface and added our logic for the logic to be executed once a new handler is invoked. Let’s move on to the controller part, where we will send a request using IMediator.
7.5 – Add CreateMovie endpoint to Movie Controller
The first thing we have to do is create a new controller named MovieController.cs inside the Controllers folder.
The controller including the dependency injection and POST endpoint is implemented the following way:
using MediatR;
using MediatR_Demo.Application.Movies.Commands.CreateMovie;
using MediatR_Demo.Domain.DTOs.Requests.Movie;
using Microsoft.AspNetCore.Http;
using Microsoft.AspNetCore.Mvc;

namespace MediatR_Demo.Controllers
{
    [Route("api/[controller]")]
    [ApiController]
    public class MovieController : ControllerBase
    {
        private readonly IMediator _mediator;

        public MovieController(IMediator mediator)
        {
            _mediator = mediator;
        }

        [HttpPost]
        public async Task<IActionResult> CreateMovie([FromBody] CreateMovieRequest request)
        {
            var movie = await _mediator.Send(new CreateMovieCommand(
                request.Title,
                request.Description,
                request.Genre,
                request.Rating));

            return Ok(movie);
        }
    }
}
I forgot to add a “?” to genre and rating” type in the CreateMovieRequest and CreateMovieCommand files. Please do that, or else you will end up with an error.
You can see all changes made to the code in this commit:
#8 – Create Movie Queries
Okay, now that we can store movies in the database it would be nice to retrieve them back the other way as well. In the code below we will retrieve a list of movies and a single movie based on the movie id.
8.1 – Create DTO for retrieving movies
First, we have to create a new DTO in our Responses folder named GetMovieDto.cs.
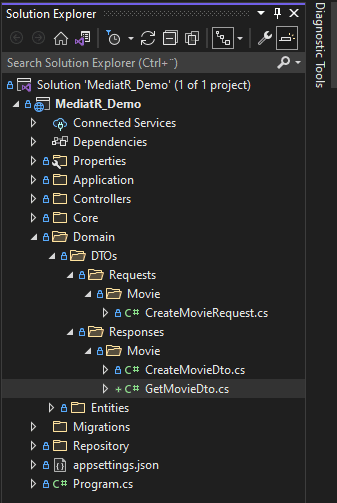
The DTO is used to display movie data. It will reflect our Movie model:
using MediatR_Demo.Core.Enums;

namespace MediatR_Demo.Domain.DTOs.Responses.Movie
{
    public class GetMovieDto
    {
        public long Id { get; set; }
        public string? Title { get; set; }
        public string? Description { get; set; }
        public MovieGenre? Genre { get; set; }
        public int? Rating { get; set; }
    }
}
8.2 – Create Query Requests
We will introduce the option the get both all moves and a single movie using the CQRS pattern with MediatR. Now we have to create a new folder in ./Application/Movies/Queries with two subfolders named GetMovies and GetMovie. Inside these folders, you have to create the following files:
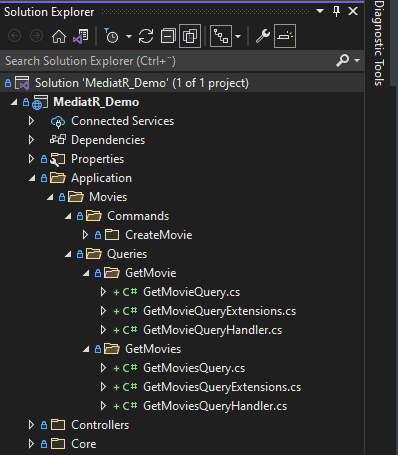
8.3 – Get Movies
First, we will create the query for retrieving a list of GetMovieDto.
using MediatR;
using MediatR_Demo.Domain.DTOs.Responses.Movie;

namespace MediatR_Demo.Application.Movies.Queries.GetMovies
{
    public class GetMoviesQuery : IRequest<IList<GetMovieDto>>
    {
    }
}
Then we will use our extension class to map the Movie DTO to a user object.
using MediatR_Demo.Domain.DTOs.Responses.Movie;
using MediatR_Demo.Domain.Entities.Movie;

namespace MediatR_Demo.Application.Movies.Queries.GetMovies
{
    public static class GetMoviesQueryExtensions
    {
        public static GetMovieDto MapTo(this Movie movie)
        {
            return new GetMovieDto
            {
                Id = movie.Id,
                Title = movie.Title,
                Description = movie.Description,
                Genre = movie.Genre,
                Rating = movie.Rating
            };
        }
    }
}
Finally, we have to create the handler to make the operation against the database to get all of our movies into a list that we can return.
using MediatR;
using MediatR_Demo.Domain.DTOs.Responses.Movie;
using MediatR_Demo.Repository.Context;
using Microsoft.EntityFrameworkCore;

namespace MediatR_Demo.Application.Movies.Queries.GetMovies
{
    public class GetMoviesQueryHandler : IRequestHandler<GetMoviesQuery, IList<GetMovieDto>>
    {
        private readonly ApplicationDbContext _dbContext;

        public GetMoviesQueryHandler(ApplicationDbContext dbContext)
        {
            _dbContext = dbContext;
        }

        public async Task<IList<GetMovieDto>> Handle(GetMoviesQuery request, CancellationToken cancellationToken)
        {
            var movies = await _dbContext.Movies.ToListAsync();
            var movieList = new List<GetMovieDto>();
            foreach (var movieItem in movies)
            {
                var movie = movieItem.MapTo();
                movieList.Add(movie);
            }

            return movieList;
        }
    }
}
The handler makes an async query against the database and stores all movie items in a list. For each movie item in the list, we will map the movie item to a movie dto and add that movie dto to the list and then return it.
In the controller, we will add a new endpoint for requesting all movies in the database.
using MediatR;
using MediatR_Demo.Application.Movies.Commands.CreateMovie;
using MediatR_Demo.Application.Movies.Queries.GetMovies;
using MediatR_Demo.Domain.DTOs.Requests.Movie;
using Microsoft.AspNetCore.Http;
using Microsoft.AspNetCore.Mvc;

namespace MediatR_Demo.Controllers
{
    [Route("api/[controller]")]
    [ApiController]
    public class MovieController : ControllerBase
    {
        private readonly IMediator _mediator;

        public MovieController(IMediator mediator)
        {
            _mediator = mediator;
        }

        [HttpGet]
        public async Task<IActionResult> GetMovies()
        {
            var movies = await _mediator.Send(new GetMoviesQuery());
            return Ok(movies);
        }

        [HttpPost]
        public async Task<IActionResult> CreateMovie([FromBody] CreateMovieRequest request)
        {
            var movie = await _mediator.Send(new CreateMovieCommand(
                request.Title,
                request.Description,
                request.Genre,
                request.Rating));

            return Ok(movie);
        }
    }
}
8.4 – Get Movie by ID
This one is a little different as we are not asking for a list, but a specific movie. In a normal case, I would include more data, when a single movie was requested. In this example we don’t have that much data, so we will return all available data.
We have already created the files so let’s go ahead and add some logic to them.
Inside GetMovieQuery.cs you have to add the following code. This query is asking for the id of the movie you would like to retrieve from the handler.
using MediatR;
using MediatR_Demo.Domain.DTOs.Responses.Movie;

namespace MediatR_Demo.Application.Movies.Queries.GetMovie
{
    public class GetMovieQuery : IRequest<GetMovieDto>
    {
        public GetMovieQuery(long? id)
        {
            Id = id;
        }

        public long? Id { get; set; }
    }
}
Inside our extension, we are doing the same mapping as we did before in the list query.
using MediatR_Demo.Domain.DTOs.Responses.Movie;
using MediatR_Demo.Domain.Entities.Movie;

namespace MediatR_Demo.Application.Movies.Queries.GetMovie
{
    public static class GetMovieQueryExtensions
    {
        public static GetMovieDto MapTo(this Movie movie)
        {
            return new GetMovieDto
            {
                Id = movie.Id,
                Title = movie.Title,
                Description = movie.Description,
                Genre = movie.Genre,
                Rating = movie.Rating
            };
        }
    }
}
You can update it to include more or fewer details, depending on what your project is about.
Inside our handler, we will make a simple query to retrieve the movie using an ID. You can read more about querying data here at Microsoft.

using MediatR;
using MediatR_Demo.Domain.DTOs.Responses.Movie;
using MediatR_Demo.Repository.Context;
using Microsoft.EntityFrameworkCore;

namespace MediatR_Demo.Application.Movies.Queries.GetMovie
{
    public class GetMovieQueryHandler : IRequestHandler<GetMovieQuery, GetMovieDto>
    {
        private readonly ApplicationDbContext _dbContext;

        public GetMovieQueryHandler(ApplicationDbContext dbContext)
        {
            _dbContext = dbContext;
        }

        public async Task<GetMovieDto> Handle(GetMovieQuery request, CancellationToken cancellationToken)
        {
            var movie = await _dbContext.Movies.Where(x => x.Id == request.Id).FirstOrDefaultAsync();

            if (movie != null)
            {
                var movieItem = movie.MapTo();
                return movieItem;
            }
            return null;
        }
    }
}
In this case, we have implemented a handler that will return null if no movie were found with the specific id sent from the requesting service.
As you can see we are using EF Core to get a movie where the id is equal to the id from the GetMovieQuery request-id.
Inside the controller, we add a new endpoint with specific routing. Else swagger will complain about equal routes.
using MediatR;
using MediatR_Demo.Application.Movies.Commands.CreateMovie;
using MediatR_Demo.Application.Movies.Queries.GetMovie;
using MediatR_Demo.Application.Movies.Queries.GetMovies;
using MediatR_Demo.Domain.DTOs.Requests.Movie;
using Microsoft.AspNetCore.Http;
using Microsoft.AspNetCore.Mvc;

namespace MediatR_Demo.Controllers
{
    [Route("api/[controller]")]
    [ApiController]
    public class MovieController : ControllerBase
    {
        private readonly IMediator _mediator;

        public MovieController(IMediator mediator)
        {
            _mediator = mediator;
        }

        [HttpGet]
        public async Task<IActionResult> GetMovies()
        {
            var movies = await _mediator.Send(new GetMoviesQuery());

            if (movies != null)
            {
                return Ok(movies);
            }

            return NotFound("No movies in database. Please add a movie first.");
        }

        [HttpGet("/getmovies/{id}")]
        public async Task<IActionResult> GetMovie(long id)
        {
            var movie = await _mediator.Send(new GetMovieQuery(id));

            if (movie != null)
            {
                return Ok(movie);
            }

            return NotFound($"No movie in database with ID: {id}.");

        }

        [HttpPost]
        public async Task<IActionResult> CreateMovie([FromBody] CreateMovieRequest request)
        {
            var movie = await _mediator.Send(new CreateMovieCommand(
                request.Title,
                request.Description,
                request.Genre,
                request.Rating));

            return Ok(movie);
        }
    }
}
If no movies were found, we will return a status message else we return the movie dto object. I have added the same error check on the endpoint retrieving all movies.
That’s it – now we are ready to launch the application and add some movies. If you want to see the changes I have made to the code for this section, you can follow along here at the commit:
#9 – Test the movie API
The moment we all have been waiting for. Now, let’s fire up the API and add our first movie. I have added Top Gun 2 with Tom Cruise. See the example below:
9.1 – Add Movies to the Database
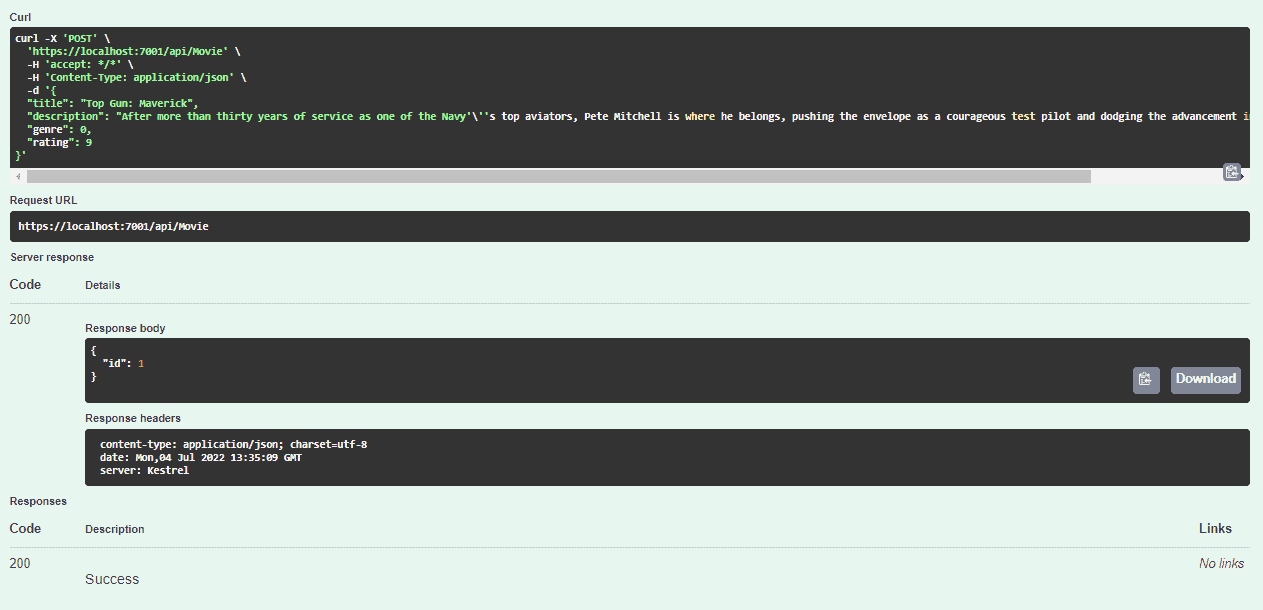
Inside our database we got the following:
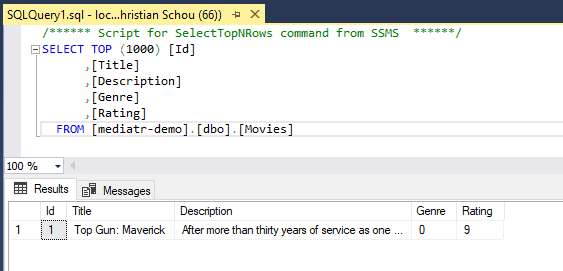
Let’s add a few more movies. Here are some sample movies you can use to POST against the API for having some data to look at.
Doctor Strange
{
  "title": "Doctor Strange in the Multiverse of Madness",
  "description": "Doctor Strange teams up with a mysterious teenage girl from his dreams who can travel across multiverses, to battle multiple threats, including other-universe versions of himself, which thre...",
  "genre": 3,
  "rating": 7
}
Lightyear
{
  "title": "Lightyear",
  "description": "While spending years attempting to return home, marooned Space Ranger Buzz Lightyear encounters an army of ruthless robots commanded by Zurg who are attempting to steal his fuel source.",
  "genre": 0,
  "rating": 5
}
Elvis
{
  "title": "Elvis",
  "description": "Elvis is Baz Luhrmann's biopic of Elvis Presley, from his childhood to becoming a rock and movie star in the 1950s while maintaining a complex relationship with his manager, Colonel Tom Park...",
  "genre": 2,
  "rating": 8
}
9.2 – Get all movies
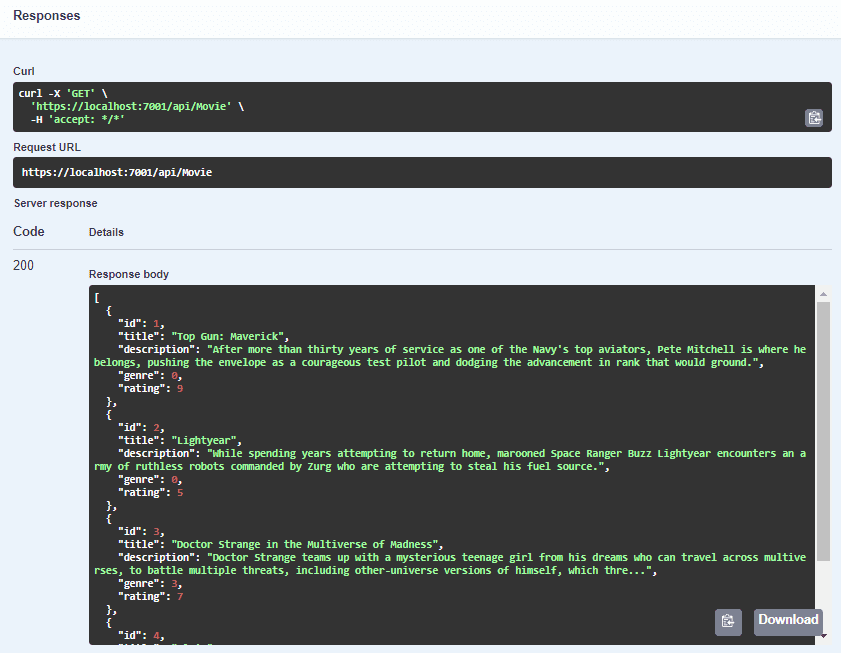
The endpoint for retrieving all movies works perfectly. In a real-world application, I would implement pagination, but that is beyond scope of this article.
9.3 – Get a movie by ID
Let’s see if we can also fetch a single movie. Let’s try number three from the movie database.
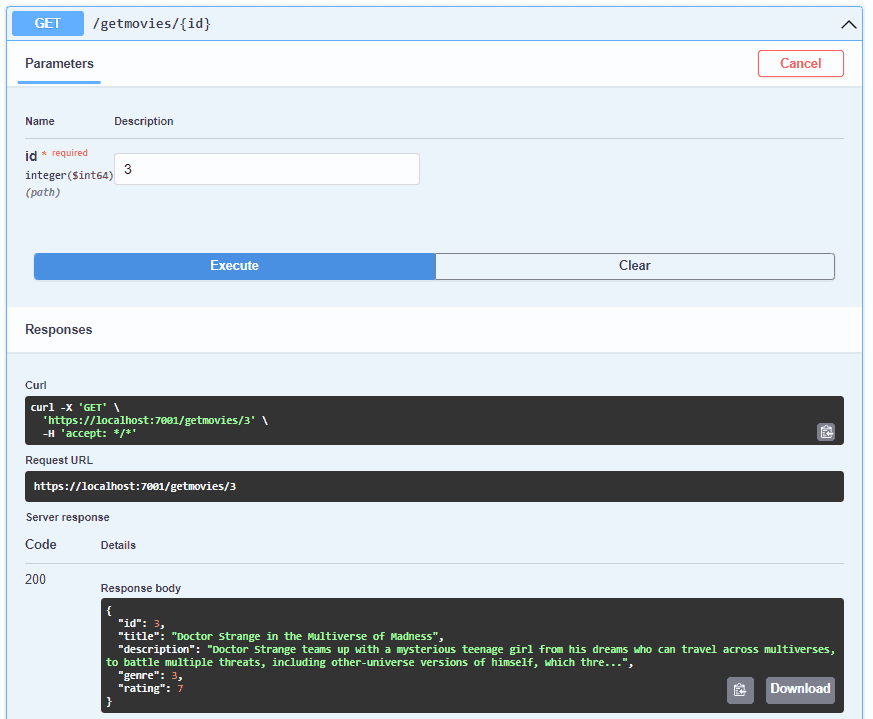
That went very well as we can see. All methods work and data is being added and retrieved just as expected.
Summary
By using the CQRS design pattern we can reduce the number of dependencies between objects in our application. By adding MediatR we can introduce message processing avoiding direct communication.
I hope this article has helped you gain an understanding of why the CQRS design pattern is a good thing when working with complex business models or just applications that are not “light” in terms of complexity.
If you got any issues, questions, or suggestions, please let me know in the comments below and I will get back to you ASAP. Happy coding out there! You can find the full repository here: CQRS and MediatR demo.


