When working with containers, we often (in 99% of all cases) need a way to access our container software to interact with it. But running multiple of the same containers in the same environment would cause some troubles... it would not be possible.
To solve that issue, Docker has something called port mapping, and that allows us to translate one port to another when configuring our containers.
In this short post, I will tell you about how Docker Compose port mapping works, with some YAML examples and illustrations. If you are ready, then let's get to it. 😎
TL;DR 🚀
When talking Docker and ports, a port is something we use to provide an option for communicating with an endpoint to exchange data between the host and a container. In other words - ports make it possible to send and receive data/information to and from a containerized application.
In Docker Compose, the ports of a service can be defined and mapped using the ports property in with YAML with the following syntax: [host:]container[/protocol] like shown below.
version: '3.3'

services:
  web-app:
    image: cool-project/web-app:latest
    ports:
      - 80:8080

...
If you wanted to, you could also manage the protocols to be either TCP or UDP, depending on your application. Here is an example of what it would look like:
version: '3.3'

services:
  web-app:
    image: cool-project/web-app:latest
    ports:
      - 80:8080/tcp

...
My example above shows that TCP port 80 at the Docker Host is mapped to the TCP port 8080 of the web-app container. This means that the docker image used for the container listens to requests on port 8080, but we can send a request to port 80 and then receive the information from the container.
If you want to see how it looks with an illustration, then check my image below, where I have tried to make a drawing that shows what is going on.
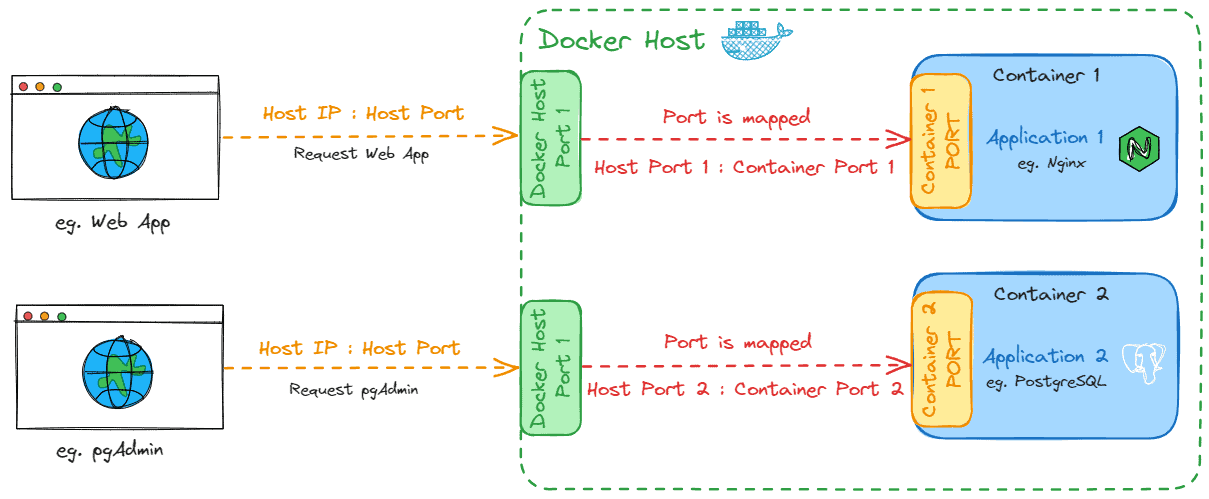
With that in place, let's take a closer look at how we can work even more with ports.
How To Map Multiple Ports
With Docker, we can run multiple services inside one container and that makes the container expose multiple ports that we have to map.
In a Docker Compose file, we can easily map multiple ports for the service we are defining. To illustrate it with a YAML example, I have copied the example from before and modified it to map multiple ports at once.
version: '3.3'

services:
  web-app:
    image: cool-project/web-app:latest
    ports:
      - 80:8080
      - 2222:22

...
In my example above the container exposes a service at port 8080 and an SSH service at port 22. Port 22 is often used for local SSH connections on the host connecting to it. To fix that I have mapped the port to 2222 at the host machine. By default all traffic is served using the TCP protocol, so no need to specify that every time.
Mapping Using Port Ranges
If you have a lot of ports, it can get messy in the compose file if you are mapping each port one by one. Instead, we can use port ranges to specify multiple host ports in one go.
To use the port range syntax in your Docker Compose file, you can follow the following pattern.
"[host_port_start-host_port_end]container-name[/transfer protocol]"Here is an example of how it's implemented in a compose file.
version: '3.3'

services:
  web-app:
    image: cool-project/web-app:latest
    ports:
      - "8080-8085:80"

...
What happens when we ask Docker Compose to spin up this file? 🤔
Docker will now look at the service and discover our port range. The first available port in our port range is 8080, and this one will be assigned to port 80 in our container. 💪
If you need the opposite, then swap the port range to be inside the container instead of the host, as I have shown below.
version: '3.3'

services:
  web-app:
    image: cool-project/web-app:latest
    ports:
      - "80:8080-8085"

...
Automatic Port Mapping 🤖
Manual specification of ports is great for production environments, where we would like everything to be configured and not left up to chance.
When developing an application we don't bother if the container is started on one port or another, we just want it to launch, test, debug, develop, etc...
If you do not specify a specific port in the compose file for your container/service, Docker will do it for you automatically. Docker will look for the first available port and assign it to your service by itself.
This is all you need to make it happen 😎
version: '3.3'

services:
  web-app:
    image: cool-project/web-app:latest
    ports:
      - "8080"

...
What happens above? 🤔 When the container launches, it will listen for requests at port 8080 (in the container). Docker will now look for the first available port at the host and assign it to the container, making the mapping happen automatically. ✅
Being Very Specific In Port Mappings
So far we have been using the short-form syntax of mapping ports in our Docker Compose file. What if we would like to be very specific about the port mapping? Well, then we can use the long-form syntax.
Just like before on the service, we use the ports section, but this time we are being very explicit in our configuration. Below is a template of the syntax for achieving this.
version: '3.3'

services:
  web-app:
    image: cool-project/web-app:latest
    ports:
      - target: "container-port"
        host_ip: host_ip
        published: "published-port"
        protocol: [tcp or udp]
        mode: host

...
Let's see that in action for our web-app in the compose file. The target on the container will be 8080, as that is the default port for .NET 8 containerized apps, and I love .NET 🥳
version: '3.3'

services:
  web-app:
    image: cool-project/web-app:latest
    ports:
      - target: "8080"
        host_ip: 127.0.0.1
        published: "80"
        protocol: tcp
        mode: host
      - target: "8080"
        host_ip: 127.0.0.1
        published: "443"
        protocol: tcp
        mode: host

...
So what exactly happens above? 🤔 Let me explain...
- The
targetproperty is used to specify the container port or port range. - We use the
host_ipto tell Docker what IP address we would like to bind on the host. (if nohost_ipis specified,0.0.0.0will be used making it available for all Docker network interfaces) - The
publishedproperty is the one we tell our host to map requests to from the client environment to the service. - As explained earlier, the
protocoltells our network configuration how we would like to communicate over the network. - Docker has several drivers for the network mode. The default value, if none is specified, is
bridge, but for this I have chosenhost. Choosinghost, allows me to remove network isolation between the container and the Docker host.
You can read more about the network configuration at the link below.
Summary
In this post you learned about Docker port mapping. You saw examples explaining how to map host ports to container ports to enable communication between the host and containerized applications. It covers key topics like basic port mapping, mapping multiple ports, and using port ranges to simplify configurations. Additionally, we also had a look at automatic port mapping and the more detailed long-form syntax for precise control over port mapping.
You should now have a clearer understanding of Docker port mapping and be able to apply this knowledge to solve your container networking issues. If you got any questions, please let me know in the comments below. Until next time - Happy Dockerizing! 🐳