I am primarily making API backends, but how can you consume one in a front-end application like an MVC project? In this tutorial, I will show you how quickly and simply.
Web APIs are the rockstars of modern system design, thanks to their high-speed performance and the way they interact with other systems. But if you're new to .NET Core, it can feel like you're trying to have a conversation in a language you don't speak. Don't worry, I've got your back!
In this tutorial, I will show you how to build a basic Web API from scratch using the dotnet CLI, and a shiny new ASP.NET Core MVC application. Then, we'll introduce them to each other and get them talking. Ready? Let's dive in! 🚀
The Outcome Of This .NET Tutorial 🔚
I will not be looking into JWT authentication between the two applications, user logic, etc. We will only generate a new .NET Web API from the Microsoft template and use the weather endpoint in our MVC application.
If you are not familiar with APIs I would recommend you to have a read about those first, as I won't be deep-diving into that subject here as well. We will only be focusing on how to bind an API to an MVC application.
If you would like to see the full source code for this tutorial, please check my link below.
Let's dive in and make a nice-looking weather app using .NET Core Web API and MVC! Oh and if you wanna join my community of awesome software developers, you are more than welcome to subscribe for free below! 🔥
Create The Solution And Projects ✨
You either chose to create the solution in Visual Studio, Rider, etc... or by using the dotnet CLI. I will be using the dotnet CLI option, as it's super fast and only requires a few commands. 🔥
Copy each line and run them one by one in your CLI. They will generate everything you need to get going.
dotnet new sln --name MvcWebApiDemo
dotnet new webapi --name MvcWebApiDemo.Api -o src/MvcWebApiDemo.Api
dotnet sln add src/MvcWebApiDemo.Api/
dotnet new mvc --name MvcWebApiDemo.Web -o src/MvcWebApiDemo.Web
dotnet sln add src/MvcWebApiDemo.Web/
This will generate an empty solution and two projects. Each project has been placed inside the /src folder. Awesome! Let's spin up the API and see what it looks like. ✌️
cd /src/MvcWebApiDemo.Api/
dotnet run
This should give you an output like mine below:
Building...
info: Microsoft.Hosting.Lifetime[14]
      Now listening on: http://localhost:5242
info: Microsoft.Hosting.Lifetime[0]
      Application started. Press Ctrl+C to shut down.
info: Microsoft.Hosting.Lifetime[0]
      Hosting environment: Development
info: Microsoft.Hosting.Lifetime[0]
      Content root path: /home/chsc/Documents/test/src/MvcWebApiDemo.Api
Now head to http://localhost:5242/swagger and see the API interface provided by Swagger. The URL is taken from Now listening on: http://localhost:5242 and Swagger lives at /swagger.
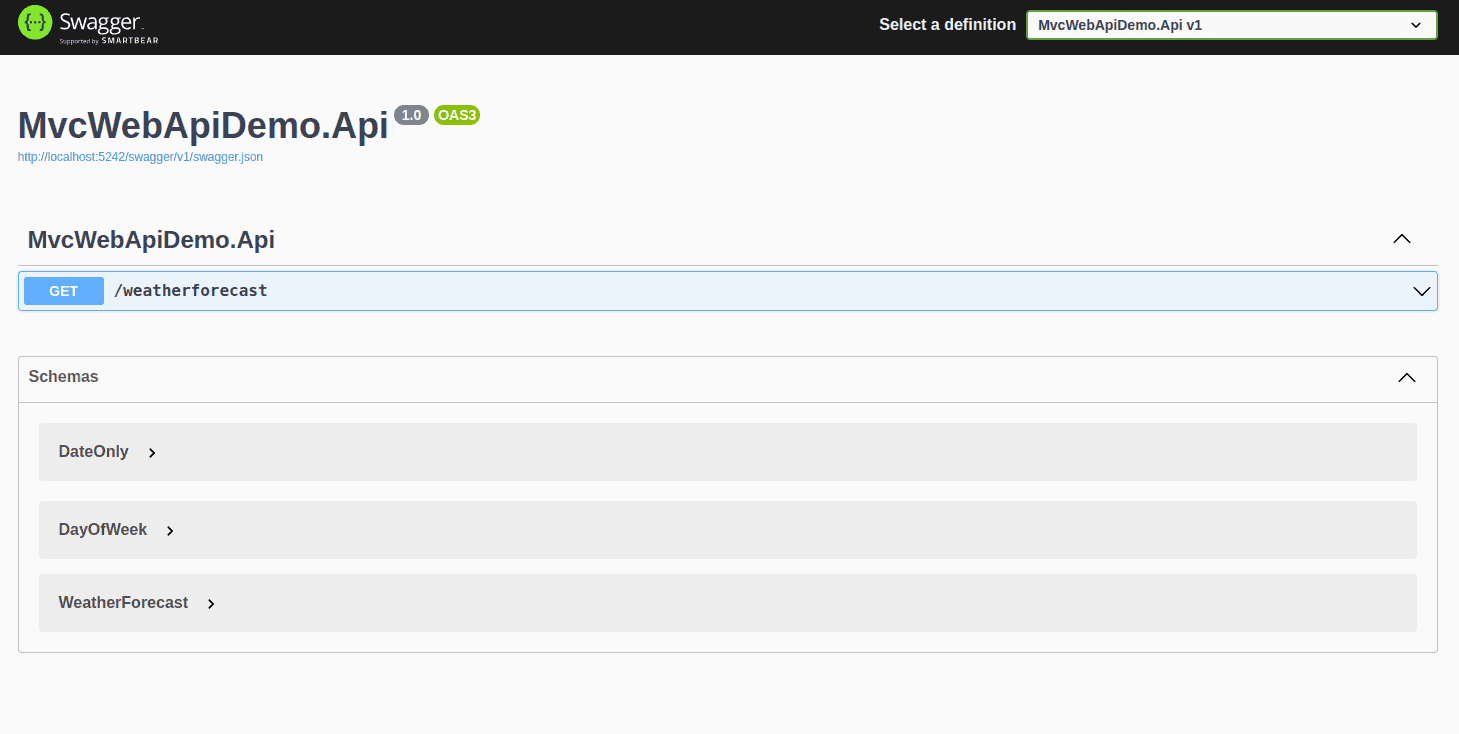
Cool right!? 😎 You can now test out the weather forecast endpoint, which is the one we are going to be using for this demo. ☀️
Now let's move on to the part, where we consume the API /weatherforecast endpoint in our MVC Web App and use Bootstrap to visualize the weather in a nice pretty way.

Consume The Web API In The MVC Web App 🌐
Now for the interesting part of this article ✌️ With the API in place, we can start to extend our MVC Web App to add support for showing a weather forecast. We will take it in small steps and I will guide you all the way.
Create A Model For The Weather Forecast 🌡️
To work with data, we need to define how they should look like. We already know the format of the data, because our API is describing it for us.
[
  {
    "date": {
      "year": 0,
      "month": 0,
      "day": 0,
      "dayOfWeek": 0,
      "dayOfYear": 0,
      "dayNumber": 0
    },
    "temperatureC": 0,
    "summary": "string",
    "temperatureF": 0
  }
]
When converted into a model in C# with an attribute for mapping JSON properties to C# properties, it will look like this.
public class WeatherForecast
{
    [JsonPropertyName("date")]
    public DateTime Date { get; set; }

    [JsonPropertyName("temperatureC")]
    public int TemperatureCelsius { get; set; }

    [JsonPropertyName("temperatureF")]
    public int TemperatureFahrenheit { get; set; }

    [JsonPropertyName("summary")]
    public string? Summary { get; set; }
}
Inside the Models folder in the MVC project, create a new class, and name it WeatherForecast, and paste in the code from above.
Create A Weather Forecast Service 🌩️
This is where the logic for retrieving the weather forecast happens. We will be using a basic HttpClient for communicating with the API. If you are interested in simpifying your API requests, then check out my tutorial below.

Start by creating a new folder named Services in the MVC project and add a new interface file inside that folder with the name IWeatherForecastService it should contain a GetAsync() method for retrieving the weather. Below is the code for the interface.
using MvcWebApiDemo.Web.Models;

namespace MvcWebApiDemo.Web.Services;

public interface IWeatherForecastService
{
    Task<IReadOnlyList<WeatherForecast>> GetAsync();
}
Now inside the same folder (services), create a new class named WeatherForecastService and inherit the IWeatherForecastService interface with the GetAsync() method we just created. By now you should have something similar to the code below.
using MvcWebApiDemo.Web.Models;

namespace MvcWebApiDemo.Web.Services;

public class WeatherForecastService : IWeatherForecastService
{
    public Task<IReadOnlyList<WeatherForecast>> GetAsync()
    {
        throw new NotImplementedException();
    }
}
Let's add the implementation to GetAsync(), so we can return some weather forecasts for the calling service. Below is the final implementation of the service class.
using MvcWebApiDemo.Web.Models;

namespace MvcWebApiDemo.Web.Services;

public class WeatherForecastService(HttpClient api) : IWeatherForecastService
{
    private readonly HttpClient _api = api ?? throw new ArgumentNullException(nameof(api));

    public async Task<IReadOnlyList<WeatherForecast>> GetAsync()
    {
        // Get the weather forecast from the Web API
        var response = await _api.GetFromJsonAsync<IReadOnlyList<WeatherForecast>>("/weatherforecast");

        // Make sure the response is not null and it contains some forecasts
        if (response != null && response.Any())
        {
            return response;
        }

        // The response from the API was empty
        // we will then return an empty list to avoid breaking the page
        return new List<WeatherForecast>();
    }
}
So what is going on in the code above? 🤔
private readonly HttpClient _api = api ?? throw new ArgumentNullException(nameof(api));- This line initializes aHttpClientinstance. It checks if theapiargument passed to the constructor isnull. If it is, it throws anArgumentNullException. Otherwise, it assigns theapito_api.public async Task<IReadOnlyList<WeatherForecast>> GetAsync()- This is an asynchronous method that returns a task of a read-only list ofWeatherForecastobjects. This method is used to fetch the weather forecast data from the Web API.var response = await _api.GetFromJsonAsync<IReadOnlyList<WeatherForecast>>("/weatherforecast");- This line sends a GET request to the "/weatherforecast" endpoint of the Web API and deserializes the JSON response into a list ofWeatherForecastobjects.if (response != null && response.Any())- This checks if the response is notnulland if it contains anyWeatherForecastobjects.return response;- If the response is notnulland contains some forecasts, it returns the response.return new List<WeatherForecast>();- If the response from the API is empty, it returns an empty list to avoid breaking the page.
With that service in place, we only need to tell our Web App that we would like to be able to inject our weather forecast service through dependency injection, hence we need to register it.
Register The Weather Service Client 🧵
We need to register our WeatherForecastService with an HttpClient and tell it the base address of our API.
Open Program.cs and add the following line just below the builder.
// Register the http client for our service with the base address set.
builder.Services.AddHttpClient<IWeatherForecastService, WeatherForecastService>(
    api => api.BaseAddress = new Uri("http://localhost:5242"));
Your final Program.cs file should look like this:
using MvcWebApiDemo.Web.Services;

var builder = WebApplication.CreateBuilder(args);

// Add services to the container.
// Register the http client for our service with the base address set.
builder.Services.AddHttpClient<IWeatherForecastService, WeatherForecastService>(
    api => api.BaseAddress = new Uri("http://localhost:5242"));

builder.Services.AddControllersWithViews();

var app = builder.Build();

// Configure the HTTP request pipeline.
if (!app.Environment.IsDevelopment())
{
    app.UseExceptionHandler("/Home/Error");
    // The default HSTS value is 30 days. You may want to change this for production scenarios, see https://aka.ms/aspnetcore-hsts.
    app.UseHsts();
}

app.UseHttpsRedirection();
app.UseStaticFiles();

app.UseRouting();

app.UseAuthorization();

app.MapControllerRoute(
    name: "default",
    pattern: "{controller=Home}/{action=Index}/{id?}");

app.Run();
That's it for the registration of our weather forecast service. Let's move on to the more visual part of this tutorial. We can now create a new controller with a page and show the result of the GET request in our service.
Create A New Weather Forecast Controller 💫
Inside the Controllers folder in the MVC project, create a new controller named WeatherForecastController and paste in the following code.
using Microsoft.AspNetCore.Mvc;
using MvcWebApiDemo.Web.Services;

namespace MvcWebApiDemo.Web.Controllers;

public class WeatherForecastController : Controller
{
    private readonly ILogger<WeatherForecastController> _logger;
    private readonly IWeatherForecastService _weatherApiService;

    public WeatherForecastController(
        ILogger<WeatherForecastController> logger, IWeatherForecastService weatherApiService)
    {
        _logger = logger;
        _weatherApiService = weatherApiService ?? throw new ArgumentNullException(nameof(weatherApiService));
    }

    public async Task<IActionResult> Index()
    {
        _logger.LogInformation("Retrieving Weather Forecasts from API...");
        var weatherForecast = await _weatherApiService.GetAsync();
        return View(weatherForecast);
    }
}
That's it for the controller. It will now use the GetAsync() method for retrieving the weather forecasts from the API and return a new view where it passes the result. Let's create a page and use the result.
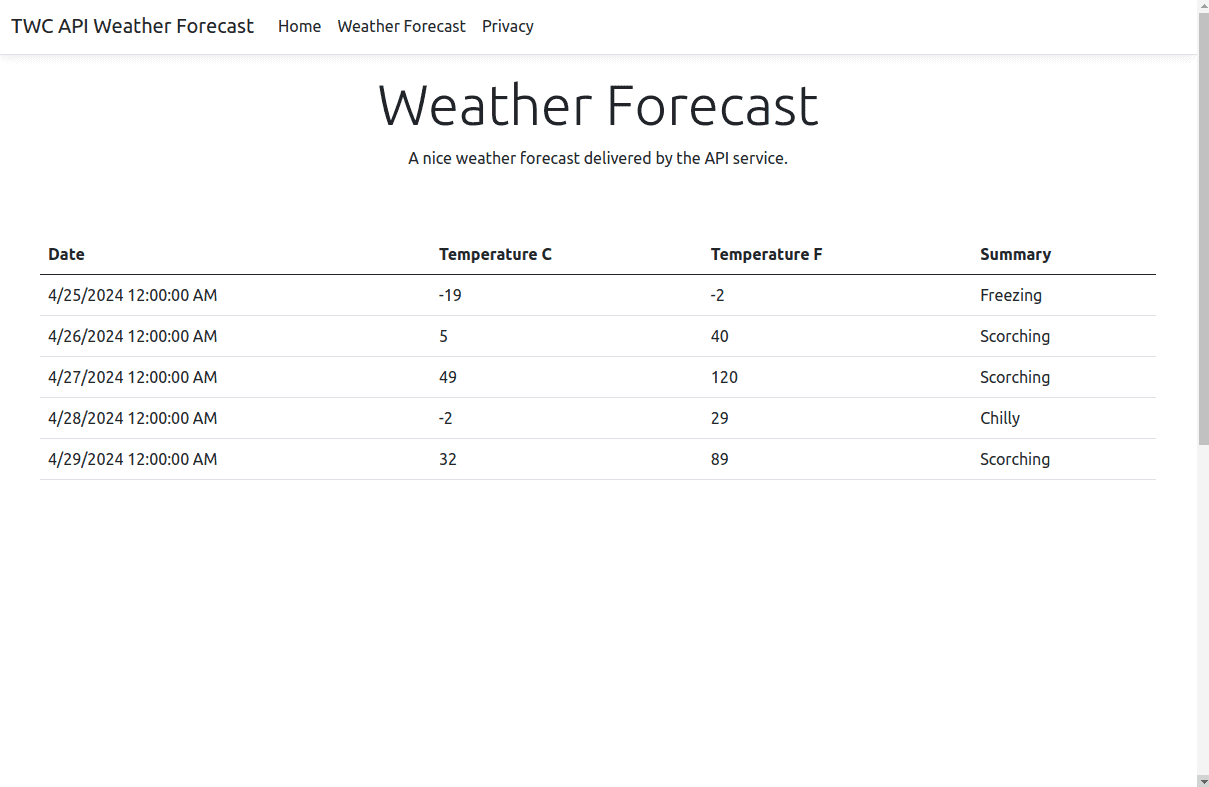
Create A New Weather Forecast Page 🌐
Inside the Views folder in the MVC project, create a new folder named WeatherForecasts and add a new Index.cshtml file inside that folder and paste in the following cshtml code.
@model IReadOnlyList<WeatherForecast>
@{
    ViewData["Title"] = "Weather Forecast";
}

<div class="text-center">
    <h1 class="display-4">Weather Forecast</h1>
    <p>A nice weather forecast delivered by the API service.</p>
</div>

<br/>
<br/>
<div>
    <table class="table">
        <tdead>
            <tr>
                <th>Date</th>
                <th>Temperature C</th>
                <th>Temperature F</th>
                <th>Summary</th>
            </tr>
        </tdead>
        <tbody>
        @foreach (var item in Model)
        {
            <tr>
                <td>@item.Date</td>
                <td>@item.TemperatureCelsius</td>
                <td>@item.TemperatureFahrenheit</td>
                <td>@item.Summary</td>
            </tr>
        }
        </tbody>
    </table>
</div>
Now open the Shared/_Layout.cshtml file and add the following line of HTML just below the navigation part for the Home page.
<li class="nav-item">
    <a class="nav-link text-dark" asp-area="" asp-controller="WeatherForecast" asp-action="Index">Weather Forecast</a>
</li>
This will add one extra navigation point in the header for easily navigating to our weather forecast.
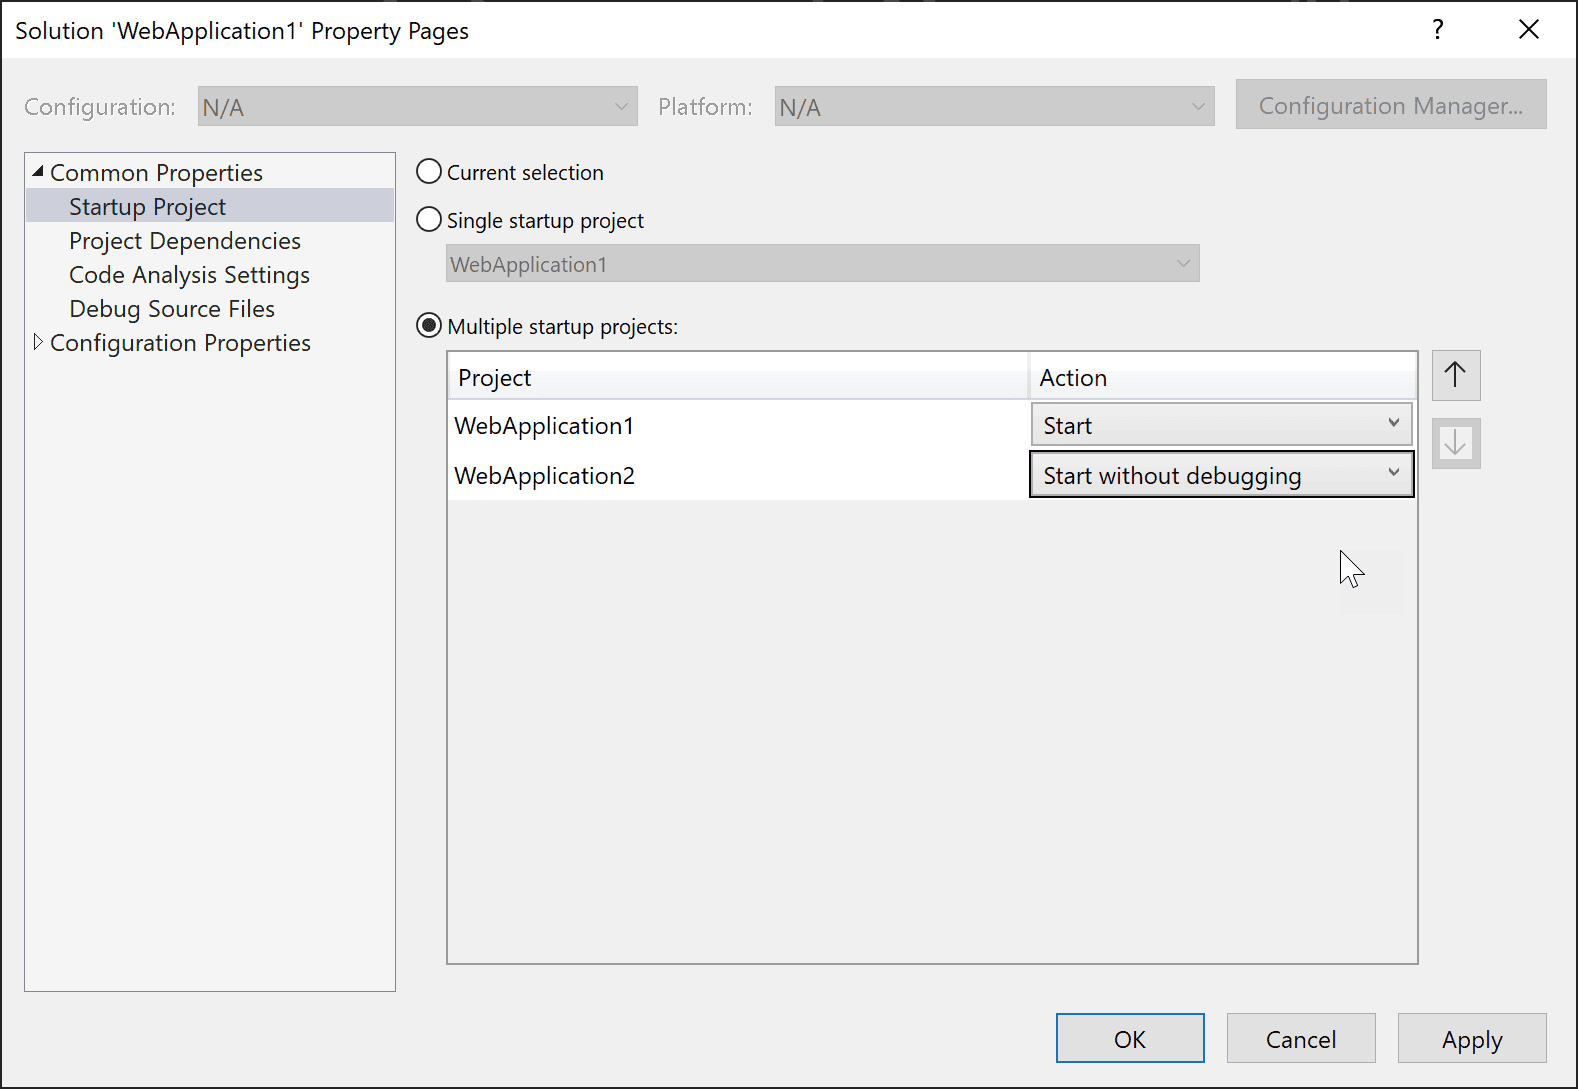
Spin Up Both API And MVC At The Same Time 🍻
This can be done in two ways.
- The first way is to configure your IDE to launch both projects in one go.
- The second option is having two terminals and executing
dotnet runin both of them when placed inside each of the projects.
Test It 🧪
Now hit the Weather navigation property and see how it shows the API result nicely. You now have a .NET MVC consuming a .NET Web API. Give yourself a high-five! 🙏
Summary 📝
In this tutorial, you have learned how to create a new .NET Web API and .NET MVC Web Application from the command line and add them into a blank solution with only five lines in your terminal.
You have also learned how to consume a .NET Web API in a .NET MVC Web Application by using the HttpClient class inside a service and how to register the service along with a HttpClient in the same go in the Program.cs file.
If you learned something new or solved a problem by following my tutorial, please share it with other developers, they might be in the same situation as you were or could maybe learn something new or make their current solution even better.
If you have any questions, please let me know in the comments below. Until next time - Happy coding! ✌️